Friday

Blogumus - Flash Animated Tag Cloud For Blogger

Okay, I know right now you must be wondering what is this dude talking about? Such a strange name for a Widget, well, that's probably because you may have not heard of it before.
Following my previous post concerning tag cloud widgets.
The benefits of having this widget is the positive SEO results it attracts, otherwise, its contents which are the big and small letters scattered over the place makes a blog look untidy.
This problem is what Blogumus in this post have come to solve.


Blogumus is a very beautiful flash animated tag cloud widget for your blog, your tags smoothly moves around when your visitors hover their mouse around them, it was originally meant for WordPress, where it  was called Roy Tanck's WP Cumulus plugin for Wordpress.
Roy Tank created the plugin and discussed its first appearance in 2008, then Amanda of Bloggerbuster tweaked it and later figured out ports that made it work on Blogger platform, so you can have it on your blogger blogs.
The widget is a combination of Flash and Javascript, and had been tweaked in a way that would be very easy for you.
Since it contains Flash content, since it contains Flash,
you'll be needing Flash Player plugin for your browser to view it (get Flash Player from Adobe)

DEMO 

  • A DEMO of this widget is shown here at the footer of  my demo blog here, it comes alive as you hover your mouse over it right?. 

HOW TO INSTALL BLOGUMUS TAG CLOUD WIDGET ON YOUR BLOGGER BLOG

Go to Design > Layout > Edit HTML
Back up your template. 
Now use CTRL + F to find

<b:section class='sidebar' id='sidebar' preferred='yes'>

 Right under the code, Copy & Paste the ones below


<b:widget id='Label99' locked='false' title='Labels' type='Label'>
<b:includable id='main'>
<b:if cond='data:title'>
<h2><data:title/></h2>
</b:if>
<div class='widget-content'>
<script src='http://sites.google.com/site/bloggerustemplatus/code/swfobject.js' type='text/javascript'/>
<div id='flashcontent'>Blogumulus by <a href='http://www.editweaks.com/'>EdiTweaks</a></div>
<script type='text/javascript'>
var so = new SWFObject(&quot;http://sites.google.com/site/bloggerustemplatus/code/tagcloud.swf&quot;, &quot;tagcloud&quot;, &quot;240&quot;, &quot;300&quot;, &quot;7&quot;, &quot;#ffffff&quot;);
// uncomment next line to enable transparency
//so.addParam(&quot;wmode&quot;, &quot;transparent&quot;);
so.addVariable(&quot;tcolor&quot;, &quot;0x333333&quot;);
so.addVariable(&quot;mode&quot;, &quot;tags&quot;);
so.addVariable(&quot;distr&quot;, &quot;true&quot;);
so.addVariable(&quot;tspeed&quot;, &quot;100&quot;);
so.addVariable(&quot;tagcloud&quot;, &quot;<tags><b:loop values='data:labels' var='label'><a expr:href='data:label.url' style='12'><data:label.name/></a></b:loop></tags>&quot;);
so.addParam(&quot;allowScriptAccess&quot;, &quot;always&quot;);
so.write(&quot;flashcontent&quot;);
</script>
<b:include name='quickedit'/>
</div>
</b:includable>
</b:widget>

We are done!, Now Preview the blog, if it comes out well, it will display on your sidebar, or any where you placed it, you may even change its location from your Page Elements. Real simple huh?


CUSTOMISING THE WIDGET

Customising is also possible
You only have to do few changes in the Variables
In this default installation, Blogumus includes the following preset variables:
  • Width is set to 240px
  • Height is set to 300px;
  • Background color is white
  • Test color is grey
  • Font size is "12"

 So from here, if there's some adjustments you want to make, so it could fit in perfectly for you, then simply edit and do your changes on the variables coloured in Red at the codes above.
When done, you can Preview it, once you're satisfied with your customisations, hit SAVE.

Hope you found this helpful as it makes your blog look more beautiful for your visitors.
Please take a second to share. ;)

Wednesday

FIX: BBM & other Android Apps to display in Portrait/Landscape mode on Tecno Q1

The excitement which came from BBM coming to Android (running Android OS version 4 and up), went viral, about 7 million users signed up via mail to get the app on BBM.com website and later got over One million users running the app after just 7 hours of its release on the Google Play store website.
It was like a dream come true for so many android users since they could now join the world of BBM and chat with both Blackberry and Android smartphone users alike.
Now, to the main purpose of this post, many Android phones, like mine which is built on Landscape type of screen were having issues with the view of the BBM App, it was bent and frustrating, BBM is not the only App behaving this way on Android phone screen built with Landscape view, other amazing apps having same problem include:
  • Instagram,
  • WeChat,
  • Skype, etc
Games like Temple Run and Subway Surfers were affected too.

So if your BBM or any other app is built to display on portrait mode, here is a QUICK FIX,
you'll need to Rotate and lock the rotated display on Landscape mode, just so that you won't have to keep bending your phone or tilt your head to understand what your phone is showing.
There are many apps that have been created to do this but the below are what I recommend, from my own experience.
Install and use it to Rotate your BBM app or any other apps.
Once the app is activated, it should correct your BBM to be displayed like the screenshot of my own below.


BBM App screen shot


Since some Android phones like Tecno Q1 are built in Landscape mode screens, after rotating an an App or Game that is originally meant to run on Portrait mode, this might affect the view, hence making some of the features, objects or tools hide away from the main screen, a good example of this is what happens when I use the app on Instagram, or on Games like Temple Run and Subway surf.

Aside the games, this Rotate app is meant to help your phone support display on any mode for easy use apps which are mainly Messengers, or Utility apps.

Hope the post was helpful. Don't forget to share. #Enjoy

Monday

Easy Guide on How To Use DroidVPN on All (Rooted & Unrooted) Android devices

In this post I will be showing us the easiest way so far on how to use DoidVPN with your MTN BIS on your Android phones for browsing unlimitedly.
DroidVPN, for up to a year now had been of great help for Android phone users all around the world, the App is another innovation from the makers of PD proxy.

MUST READ: *Updated* MTN BIS Now Working on Android Again with DroidVPN (for July 2014!)

According to the developers, this sofware is built for android devices. It can be used to bypass the restrictions of your ISP, and protect your Privacy against anyone that may be lurking around, searching for ways to steal your information.
More so you can use this Android VPN App to:
  • Encrypt your Data,
  • Go Anonymous 
  • Protect your info, especially when Connected to WiFi
  • Gives you Security 
  • Unblock websites
and it's Very Easy to use, with just few clicks, the engine starts.

mtn droidvpn


MUST READ: Tips to ByPass/Exceed 100MB Daily Bandwidth Limit on PD-Proxy with MTN BIS

Tips to ByPass/Exceed 100MB Daily Bandwidth Limit on PD-Proxy with MTN BIS - See more at: http://www.editweaks.com/2013/09/tips-to-bypassexceed-pdproxy-100mb-daily.html#sthash.0BSgGNQp.dpuf
As we may know, both PD Proxy and DroidVPN perform same functions, only difference is while PD proxy was meant for PC users, DroidVPN is built for most Android mobile or android tablets.
Let's cut the description and get to the main thing.
Browsing Unlimited is very Possible with your Android and DroidVPN app. Simply Follow the procedures below.

REQUIREMENTS:
1. Your Android phone
2. DroidVPN software, Download it here from Google Play
3. A DroidVPN account,  Sign Up for a Free (Trial) Account here.
3. an MTN BIS subscription
4. Your Connection settings - APN must be set as: blackberry.net

How To Use DroidVPN - For Unrooted Android device

We believe you now have the above requirements ready, now switch on your Data Connection
> Open your DroidVPN
> Go to the DroidVPN Menu >> Settings >> You'll Find "No Root Mode - Use DroidVPN without root access" - Tick it
> Go back to your Settings >> Connection Protocol >> Connect using ICMP
Now go to the main menu, make sure your Data Connection is Active, Tap Connect, wait a few seconds,  once you're Connected, you'll see something like the screenshot below.
If you're still on Trial account, Be sure you choose one of their FREE SERVERS
N.B: Confirmed working mostly on Android OS versions 3.2 and below

How To Use DroidVPN - For Rooted Android device

>Open the DroidVPN
> Go to the DriodVPN app Menu >> Settings >> You'll Find "No Root Mode - Use DroidVPN without root access" - Leave it unticked
> Go back to your Settings >> Connection Protocol >> Connect using ICMP
> Again go to the DroidVPN and click Connect, wait for few seconds,and you'll be connected.

NOTE 1: Android OS 4.x and newer versions don't need to be rooted for DroidVPN to work on them - meaning DroidVPN works on all Unrooted and Rooted Android OS 4.x and up.

NOTE 2: All DroidVPN Trial accounts are  restricted to DEMO Servers and given only 100MB daily, once you use up this 100MB Limit, you'll be disconnected.
For unlimited downloads + ability to pick any country Server of your Choice, you can buy a Premium Account voucher, My Friends do Sell Vouchers for premium accounts.

You've been hearing of people browsing "almost" Unlimitedly with their Android devices and an MTN BIS right?
So far you follow the above procedures carefully, you too can partake in browsing unlimited with your Android device.
Did you find this Post helpful? Your Questions and Comments are Welcome, or just say thanks by hitting the Share Button.


Saturday

Tips to ByPass/Exceed 100MB Daily Bandwidth Limit on PD-Proxy with MTN BIS

PD-proxy with MTN BIS (Blackberry) subscription had been a lasting quality solution for Unlimited browsing and Downloads in my country.
There had been so many reviews that speak well of the PD Proxy VPN app and its quality service.
Just incase you're hearing of  for the first time, PD-Proxy is a tunneling software that can secure your internet connection by encrypting all your connections to the internet.
You can use it to access blocked websites, it uses industry–standard Virtual Private Networking (VPN) technology to create a secure tunnel between your laptop and the PD-Proxy servers.


Unlimited PdProxy


PD-Proxy is an awesome tunnelling software, as we don't only use it for Privacy, but can also use it to surf the web with our various Blackberry subscriptions, in my country it could be working Unlimitedly with networks like MTN and Etisalat.

Well that's the intro, now let's get down to main purpose of this post.
After Signing up for a new Account on the PD-Proxy site, as we know, we are given 100MB on our Trail Accounts for Just One Day, once you exhaust your 100MB, you get a Pop-up message saying
"100MB daily Bandwidth Limit reached, pls Upgrade to Premium Account"
there's nothing you can at this point, till the next day PD Proxy reloads all trial accounts with 100MB again.
Meanwhile, heavy downloaders like me and you know 100MB is way too small for our Internet activities, so I've come up with few tips on How I Exceeded this Limit of 100MB per day, which you can try too, it works but NOT ALL THE TIME.

Requirements:
To get PD Proxy working on your PC, Get PD Proxy on your PC from the Official website, Subscribe to any MTN BIS plan, you pick any of the following Activation codes with their Prices:
  •  MTN Blackberry BIS Complete Daily – N100 Activation Code.
    Text BBCDAY to 21600
  • MTN Blackberry BIS Complete Weekly, – N500 Activation Code.
    Text BBCWEEK to 21600
  • MTN BlackBerry Complete Monthly, 30 days – N1,000
    Text BBC to 21600
N.B: these SMS activation codes only work for MTN Nigeria.

Exceeding 100MB Daily Bandwidth Limit on PD-Proxy

Tip 1: Get a PD-Proxy Voucher :

Going Premium sets you Free and Unlimited
This is the first thing I'd recommend for you, coz you can't force it to work again once you've used up your 100MB in a day, that's headache and waste of time, there are various Places to buy Voucher for a Premium Account.
You can check out the PD proxy Resellers Page for List of Authorized sellers and how you can Contact and pay them for your Premium accounts.
At least after buying a voucher, you are rest assured of yourself there won't be any issues for a service you paid for.

Tip 2: Performing some Unusual activities

Restarting all Connections
Some websites boast of tricks they use for Bypassing the 100MB Limit by doing some changes in the File host/log of the Tunneling App, I haven't tried this before, but from my observations, these tricks don't work right now, well maybe they used to.

Here's How I Exceed Mine: This sure had worked for me a couple of times, Restart your connection when you notice Data Received is getting to 80MB (be sure to always monitor your PD Proxy dashboard so you can know how much data you consume from there), once you notice it's climbing up to 80MB, disconnect it, Close all connections too from your Modem, wait up to 10 minutes then reconnect everything again, this would automatically tell PD proxy that you are login in to your Account for the first time that day, hence they'll Reload it with 100MB for you over again.
This trick don't work all time especially when you hurriedly reconnect, so to increase chances, be patient, give it some time, or you may even Restart your PC.

Tip 3: At pick, Never close Or Interrupt the Connection

This one sure works well, I use it to bypass the 100MB Limit quite alot,
For Full Proof here's mine, and yes, I'm using a Free (Trial) account.

Exceed 100MB PDproxy

To exceed the 100mb with this method, When you notice you are reaching the limit, perhaps you have used up to 90MB, well, don't bother disconnecting anymore as we do in Tip 2, just continue Surfing the web, start especially Downloading and Streaming videos, it will help you exceed the Limit.

NOTE: You'll surely need a stable High speed data connection from your Internet Service Provider (ISP) to do this.
Did we find this post helpful in some way? if you have Questions or something to say about PD proxy or similar VPN app, your comments are welcome.


How To Download & Install 2go for Android from Google Play

Since the launch of the New 2go for Android, with it's smart looking design and features, 2go users in Nigerian and few other countries across Africa had been finding it quite difficult to Download and Install the amazing Chat application.
I also went through this same challenge, I would visit Google Play, Search for 2go, when downloading the file (about 2.25MB), it gets to 600kb or 700kb and shows me "package file is invalid"


In many cases, we are advised when Installing an App that gives error such as: "Package file is invalid"

The Fix is:


  • Go to settings > Applications.
  • Open all applications/manage applications.
  • Move to Google Play Store.
  • Then clear data and clear the cache 


  • Well, if that still did't help, here's How I installed 2go App on my Android.
    • Go to Google Play,
    • Install HideMan VPN, Do not open yet
    • Close your Google Play app if it's still running
    Now Launch the HideMan VPN app and Connect
    After some seconds, when Connected, it will change your Country and I.P


    Now head back to Google Play, Search for 2go, and Download again, this time it won't give you any more errors.

    NOTE For Installing INSTAGRAM APP on Your Android

    This same method applies if you are having difficulties installing Instagram, I used HideMan VPN to install Instagram on my droid, but Do not use HideMan VPN to Register on Instagram for the first time on your Android, when I did, my Account got Suspended immediately.
    After Installing Instagram, be sure you disconnect HideMan VPN before going back to launch the Instagram.

    I really don't understand why some Applications bring errors or don't download when we use our original country I.P on Google Play, but I'm pretty sure, the problem will be solved once you're Connected through some VPN application.

    Enjoy!


    Friday

    How To Hard Reset Tecno Q1 and Other Android 4.0.x Phones

    Finally, I decided to move to the top trending smartphone OS in the world right now, Android, so I got an Android smartphone for the first time, a Tecno Q1 running Android 4.0, Ice-cream Sandwich.
    Everything about the phone had been cool with me, except the battery performance which I would best describe as "not very reliable".
    Any ways, if you own same Tecno Q1 just like me, or some similar Android 4 smartphone, after some time, issues are likely to come up, because

    • Your Cache would be increasing, consuming space in the phone
    • Your Android Phone may be unable to boot up
    • or you could be seeing some strange Apps, and Files which are irrelevant and stubborn to Uninstall.
    The Best and Safest way solution to this is to perform a factory reset on your Android phone (recovery mode), this will wipe everything and restore your device to its factory state.
    This method works on many Android 4.0 phones, but I specifically used the below method on my Tecno Q1 Android 4 phone and it was reset perfectly.

    There are Two method used in Hard Reset, depending on the problem the phone has.
    • Hard reset method 1: used When your phone is Unable to boot up
    • Hard reset method 2: used When the phone can boot up.

    NOTE: Hard reset would wipe off all your Data, including all Google Authenticator credentials, so Make sure you do a Back up of all your Important files/folders before performing the Hard Reset.

    Hard Reset method 1:

    So if the phone wouldn't boot up, Let's Get it Fixed!

    1. Hold your Volume Up + Power Button, you're gonna get something like the screenshot below.


    recovery menu

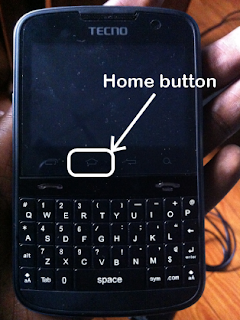
    After this display on my Tecno Q1, I got confused, all buttons used on other Android phones to bring out the Recovery menu didn't work. Till I realised it's the Home key I had to use.

    Hard Reset on Tecno Q1 Android


    2. Tap your Home button to bring the "Recovery mode Menu"

    system recovery Tecno Q1 Android

    Use the Volume Up and Down key to scroll up and down,
    3. Scroll down and Select wipe data / factory reset
    To select this, Again, Tap your Home button


    Hard Reset is now Activated, Select - Yes erase all user data with the volume buttons and tap the Home button.

    It would take few seconds to wipe off all the Data, Reboot the phone, and bring it back to it's Factory state.

    Hard reset method 2:

    If the phone is able to boot on and operate, You can do a Hard Reset right from your Screen
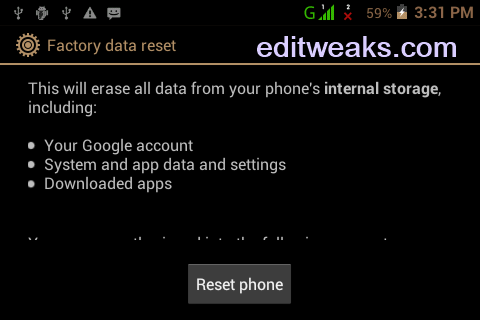
    Goto Settings >> Backup & Reset >> Scroll down to Factory Data reset and Confirm this by Clicking "RESET PHONE"

    hard reset tecno Q1

    Hope this solved some issues you might be facing with your Tecno Q1 or other Android 4.0 smartphone.
    Comments are welcome, also kindly take a second to Share with friends.

    Saturday

    Create Your Own Custom E-Mail for Your Website, Fast, Easy & Free!

    For more than a year, I ignored the use of a custom e-mail address and kept using Hotmail as my contact address, as time went on I started to realise there were even more benefits with owning my own Custom mail address.
    If you have a custom domain/website, as a blogger, a webmaster, consultant etc, you can improve the way clients contact you by setting up your own customised mail address.
    Domain registrars or hosts offer this service, but not all Registrars give it to you for Free, meanwhile in this post I will show us the Latest method on how we can get it Set up, Free, Easy and Very Fast.


     REQUIREMENTS
    • A working website domain
    • A Google Account

    1. Now Go HERE, click on Get Started and Fill in the form including A primary email address to Start using Google and administrating the custom mail service.

    After signing up, check the mail you used in signing up, you get a link back to where you now Sign in again with your Custom Domain address, choose E-mail, and Hit GO.


    You can add more users from your panel if you want.

    Now your account is set, next thing is You'll still need to

    2. Verify that you own the domain,

    Depending on your domain registrar, this will require you to input some records in your MX and CNAME in the DNS, when configuring this I used NameCheap Free DNS which gave me Total Control of my domain, since my Domain Registrar didn't offer me DNS Management.

    3. To activate your custom mail

    I believe you've opened your DNS Management Control panel now, so all you need do is enter the following MX records to point your domain to Google mail servers:

    10 ASPMX.L.GOOGLE.COM
    20 ALT1.ASPMX.L.GOOGLE.COM

    20 ALT2.ASPMX.L.GOOGLE.COM

    30 ASPMX2.GOOGLEMAIL.COM

    30 ASPMX3.GOOGLEMAIL.COM


    NameCheap even made it all easier by automatically adding Google Apps Email tool,
    Simply scroll down to MAIL SETTINGS >>  
    click on  "User (Mail Server's Host Name Required)"
    and there! you'll find it, Mark the  Google Apps Email.
    Hostname should be filled with the "@" signs then fill in MAILSERVER HOST NAME with the above Google mail servers I provided us above.
    Scroll down and Click SAVE.


    Hope this helped you to move on to something more professional.
    Regards.

    Tuesday

    Is it Worth Packing a Netbook or an iPad?

    When it was first produced, the Netbook heralded the advent of a smaller, less expensive and more portable laptop. With lower prices than a conventional laptop they were thought to be the future of technology on the move. However, then came the tablet format in the form of the iPad. Suddenly, the netbook had a serious challenger!

    So, when I am going on a trip or holiday, I always wonder what I should pack — A netbook or an iPad?

    Must Read: iPad Mini vs. Kindle Fire HD vs. Nexus 7: Why it is called Battle of the Tablets

    On the move

    Both the iPad and the netbook claim to be highly portable. The ease with which I can get online and search the web offers great convenience. The netbook, although lighter than a traditional laptop, is still relatively weighty and unfortunately it struggles to compete with the iPad on the clarity of its screen display.

    ipad-or-netbook

    Viewing angles can also be a challenge, with the display becoming difficult to see unless I am viewing it head on. The iPad is lighter and smaller than a netbook; it has a fantastic display system that offers brilliant clarity no matter what angle I am looking at it from. With a longer life battery, the iPad can potentially give hours of viewing whilst out and about.

    Browsing the web

    As searching the web is one of the main functions I need, whichever device I choose must be efficient at browsing online and make it an easy and simple experience. A netbook has the advantage of ultimately being a scaled-down PC so I have the option to opt for any web browser and it fully supports Adobe Flash player. The downside is that screen quality again, which when combined with the size of the screen – usually around 10" in size – can make reading and viewing more difficult.

    With the iPad clearly winning on these fronts, I start ask myself whether could it be time to sell my netbook and just stick to the superior screen abilities of the iPad.
    With the tablet device,the fabulous screen display makes viewing anything a pleasure and I can easily flip between pages online. The only problems lie with the fact that, as it's an Apple product, the only browser that I can use is Apple Safari, whilst Adobe Flash – which is used by so many websites – is not supported at all.

    Video and audio capabilities

    My primary reason for buying one of these devices is for watching films, catching up with TV and listening to music. Although the screen quality is not comparable between the two, the netbook does allow me store a significant number of downloads. However, it struggles to display HD and the screen size doesn't always make for easy viewing. The iPad was created for this type of use; the Retina Display in the latest version gives brilliant screen quality and iTunes provides fast and easy access to a huge library.


    So which will I pack?

    The netbook might be a good option if I need a little more capability on the move and is ideal for short breaks. For longer trips, I tend to take a more traditional laptop. For overnight or weekend breaks, when I am planning to browse the web and watch TV or films or listen to music, the iPad would be my preferred choice. It slips perfectly into an overnight bag.

    Monday

    How to Unlock Huawei USB Modems To Make and Receive Calls

    I use a previous version of Huawei modem for my internet connection, since the previous version of Huawei modems did not support Voice and Video calling, I have to be going through stress of removing my SIM card each time I'm through with the modem and put it back on the phone, that was not even too bad, the worse case was when friends later called, telling me I don't pick their calls, this was because my line would ring while it was plugged to the modem without an alert telling me there's an Incoming call for me, I could not make calls too.
    All these changed when I stumbled upon the perfect solution for this which I'm going to be sharing in this post.

    To Make and Receive Calls using your Huawei USB Modem

    First, you must Unlock your Huawei modem using DC-modem Unlocker.
    Next, Make sure all your Internet connections are switched off.
    1. Run the DC Unlocker
    After Installing, plug in your modem, you can now view this post for complete guide on how you can Unlock your Huwaei Modem, depending on your modem type/versions

    2. Once you've successfully Unlocked your Modem, you can now Download and Install Mobile Partner by Darshana

    Mobile Partner by Darshana

    The application contains the latest dashboard for your modem, everything you would do right from your mobile, you can also do it there from the dashboard on your computer system.
    • Make and Receive Voice and Video calls
    • Send and Receive SMS, MMS
    • USSD, Call history etc.
    The connection comes with few Access points pre-installed already for various Networks, if yours is not Listed.
    Create a New Access point by going to Tools >> Options >> Profile Management >> New

    Install Mobile Partner by Darshana


    NOTE: To use the new Mobile partner dashboard, Make sure your previous default Modem's dashboard is closed. You can't run two dashboards at the same time.

    When you've finished inputting all required details of your access point, click Save, go back to the "Connection" dashboard, choose your new Access point from "Profile" and hit connect.
    As you connect to the internet with this app, you also won't have to worry about Missing your calls as this app will enable you know when you have a caller, so you can pick it and speak with them right away.

    Friday

    5 Ways to Protect Your Home Wi-Fi

    Setting up a Wi-Fi connection at home gives you the freedom to connect from anywhere around the house, but it also leaves your Internet service vulnerable to intrusion. If you're just installing home Wi-Fi today or if you're a long-time user who wants a little extra protection, consider these methods to keep your connection clear.

    1. Device Encryption

    WiFi encryption
    All modern wireless routers come with their own internal security measures, but for ease of use those extra settings default to off. You can check 4G coverage to see if you have access to this device
    By going into your router settings, you can set the level of security you would like to use.

    •    The best protection setting today is WPA2. This is a strong encryption designed specifically for Wi-Fi. The downside is that not all devices currently support WPA2, so make sure both your wireless adapter and any devices you use to connect to the Internet support WPA2 before activating it.
    •    Classic WPA (Wi-Fi Protected Access) should be supported by any modern device. If you can't activate WPA2 or aren't sure if your devices support it, go with WPA.
    •    Many routers still offer WEP (Wired Equivalent Protection), but it's rather outdated. Avoid using it whenever possible.

    2. Change Your SSID Settings

    The SSID is the name of your wireless connection. Your router will create a default SSID, so if you leave the name at the default, it suggests to unauthorized users that you aren't paying attention to your connection. You can change your SSID name, which is the equivalent of putting a "No Trespassing" sign on your property. You can also disable SSID broadcast, which will remove your connection from any outside lists of available connections. Disabling SSID broadcast is best for simply securing your connection against casual outside users, though it's less effective against hackers.

    3. Set Strong Passwords

    It's just common sense to make sure any important password for your devices or personal information is hard to hack. A good password should have the following qualities:
    •    At least ten characters in length
    •    Mixed uppercase, lowercase, numbers and symbols
    •    Random rather than relevant no pet names, birthdays or other obvious personal info

    4. Choose the Right Router

    No matter what security settings you choose, you'll want a good, reliable router to give you the best, most stable wireless connection. Research router specifications and take recommendations from trusted sources. Modern wireless routers tend to be easy to install. Even if you're new to Wi-Fi tech, there are plenty of online resources that can guide you through Setting up a Belkin Router or another high-performance device.

    5. Change Admin Settings

    The last thing you'll want to do when installing a new wireless connection is to make it impossible for an unauthorized user to gain administrative access. To do this, you can change the default router user name, which is probably "admin" out of the box. You should also disable wireless administering in the Local Access Management settings, though this will require you to connect to your router with an ethernet cable to make administrative changes.
    With a little research and preparation, you can ensure your home Wi-Fi connection is totally secure. You'll be free to access the Internet in your own personal cloud without having to worry about hackers or nosy neighbors.

    About The Author:
    Abigail Clark is an upcoming freelance writer. She graduated from The University of South Florida with a bachelors in marketing, minoring in journalism. When she isn’t up to her neck in coupons she is enjoying the outdoors fishing. She loves doing reviews for technology, home products and beauty products. If you would like her to do a review for you look her up on twitter.

    Saturday

    How To Manually Clean temp Files/Folders on Windows 7 & Vista

    As time goes on, our PC can start acting funny, running slower than normal and can even get you frustrated.
    I will use my notebook as an example, I run the PC with Windows 7 Operating System, after few weeks to my annoying amazement it started to take too much time to open applications that were already running in the background, I had to walk around the Windows environment and the web, trying to find out how I can make it perform faster and better, I discovered temp files were the surest thing I had to tackle to solve this.


    Must Read: Slow Laptop? Fix It in 7 Easy Steps

    Temporary or temp files build up over time and eat into your precious disk space. When you install programmes, the installer uses temp files as part of the set up process. Some programmes also use temp files when in use. These temp files should be removed when the installer or programme is finished, but this does not always happen. And, of course, your browser will collect temp files as well. A build up of temp files could leave Windows struggling to find room for its swap file, so everything slows down.

    Hence Cleaning Temp files is a necessary operation to carry out if you want to maintain your PC, and here's how you can do it. It takes nothing more than 5 minutes.

    How To Manually Clean and Delete temp Files

    1. Click your Windows Start Button
    2. In the Search "Programs and File" Box, Type - Run
    It will open the command prompt, there again type- %temp%


    Hit Enter, this command will launch all Folders designated as the Temporary folder where temp file are stored on your Windows Vista or Windows 7, another funny fact is that all these tons of files and folders are no longer being used by your computer, no need keeping them, so they can all be safely deleted.

    3. To remove the files individually, press and hold your Ctrl key, then use your mouse to left-click (Select) the items you wish to delete, after selecting, release your Ctrl key and Press Delete on your keyboard,confirm deletion and Shazam! You are done!

    4. Perhaps you'd like to remove all the Temp files and folders at once, press Ctrl + A

    NOTE I: If you're prompted that there are hidden files in this folder, just click on OK to bypass the message. A few hidden files hanging out in the Temp folder probably aren't important enough to worry about.

    Confirm Deletion when prompted, after they are all removed, you can go and empty your Recycle bin so that no one is still left on your computer.

    NOTE II: You may be getting errors, refusing to delete some of the temp files and folders, if you experience this, it means some running program is still using it, simply close that program, and try again, if the errors persists, then Restart your Computer and try the steps again.

    Though, I still suggest you restart your computer after you do the whole temp cleaning process and emptying your recycle bin, your PC should start performing better and faster once all the steps are all well Followed.

    Comments and Questions are Welcome, meanwhile, kindly take a second to Share this with friends who might need it.

    Thursday

    Ways to Drive Traffic To A Single Content

    In order to achieve the online success, you are supposed to understand its fundamentals, which states that you get quality traffic only through valuable content. Most of the bloggers and webmasters may not be facing the risk of having poor content; however, they seem to lag behind the idea of reaching out to their targeted people at the right kind of time.


    Must Read:  7 Great Places I submit My Blog Posts for Fresh Traffic

    In today’s competitive world, the webmasters and bloggers should learn the ways of reaching out to their niche target through quality content. They should know the art of getting their desired traffic with a single content. Driving traffic to a single content depends on a number of elements and hence achieving this target is not often an easy job to accomplish. In fact, the idea of getting traffic to a single content is a time consuming task, which demands good skill sets, experience and patience.

    article


    Now, let’s focus on the different ways to drive traffic to any single content as discussed in the following paragraphs:

    Produce Quality Content

    Content has prime importance in search business. If you are willing to draw traffic to any particular content, make sure it has all the quality, relevance, and authority to impress upon the search engines and visitors. A single interesting and well researched content is more capable to attract traffic than several write-ups with poor quality. You should know the art of producing high quality content then getting higher traffic becomes a reality. You cannot attract traffic by having mediocre content. Before producing such content make sure you start identifying the issues, which visitors over your site are facing. Does your content is able to deliver the visitors proper solutions, are these issues manageable should be the questions, which you need to answer. You content should be motivating, captivating and informative, which means it should carry the essence of impressing the minds of your readers. Plus, such content is also competent enough to attract search engines.

    Develop a Good Foundation

    Once you have developed a compelling content you now want to start attracting people towards the single content. You are now supposed to map all the steps to work this out. This is nothing but the strong kind of foundation for a successful site or blog. In the initial stage, you are supposed to first try to reach out to limited viewers in the first week along with increasing the number of visitors in the following week. Carrying out things in this format will help you in getting the right viewership rating. This foundation will help the bloggers in specifying what he or she wants to carry out in order to simply popularizing the single content. Keep in mind to focus first on the title first and then over the post. The titles should be catchy along with having the targeted keywords, which can bring in more traffic to your content. The fact is more than 70 percent of traffic is driven by titles alone and not by other ways.

    Simple Navigation

    Navigation has a great role when it comes to search engine optimization. By taking care of your site or blog navigation, you can easily attract both the traffic and search engines to a single content. This will help in getting more visits over the single post or article. Keep in mind to keep the navigation simple and clear as much it’s possible. This will simply help in allowing the web users or your target audience to find out easily. For better results don’t forget to add a proper menu navigation bar. Keep in mind if the content simply appears over the same menu unlike the home page as this will be deemed as a highly relevant option.

    Connecting with the Power Users

    The power users are bloggers, content marketers and webmasters who are known to have a strong presence over the web. People in your niche area know them and they are the ones who have great influence over the web and especially in your niche market. The idea here is to influence or impress these power users and leverage from their influence to generate traffic for your single content. However, for this, you need to develop high quality content, it can be anything, a good and well researched article with good use of inforgraphics or a nice video about your niche area. Once you have this, try finding out such people and try to link with these people. Once you influence them, you get the chance of guest posts over their blog and share your content over their sites or blogs, which are considered as authority in your niche area. This will certainly end up generating a good traffic for your single content.

    Final word

    Generating traffic via single content can be challenging and intimidating task, however, with the above tips and tricks, you can end up getting your desired results. All you need to do is to try them out with patience and consistency.

    Friday

    Open Management System Suite - A Solution for Fixed & Mobile Broadbands

    With the continuous improvements of broad band technologies, At our various homes, place of work or some well developed locations, we may all own or have noticed the use Mobile Broad bands, VoIP devices (on Iphone for Example) and even some connectivity Apps, all which is needed to keep activities going smoothly in a state of technology that is in good shape.


    Broadband axiros.com

    Here I will be introducing us to Open Device Management Suite - Axiros - Lasting Advantage
    The Open Management System suite is a sure platform which renders all these mentioned above as long as broadband technology is concerned, if you're seeing this for the first time and seem like you don't understand it, do not worry, as I will have it explained so we all can have a clear picture of how this can be of great help to us, especially for businesses that provide Internet and mobile broadband services.

    For example, if you already run broadband services, you could be using this to :-

    Manage PCs

    Whether it's personal or for your customers use, with the service you can enable your ISP to manage network operator, and PCs. Including WiFi encryption and open websites that can be viewed for your customer via Axess Support tab.

    Router Management

    It Supports full dynamic automated models, highly effective and keeps activities in control considering the fact that new forms I.Ps like VPN, VoIP, QoS, MPLS are formed everyday.

    Manage Residential Edge


    With the Axiros Suite for your mobile broadband, you can mange WiFi, Firewalls, and customise content filtering settings
    Allow policy management for optimised bandwidth consumption for your customers
    Provision Voice, Video, and data services.

    Those are the services you'll be getting from the open management suite by Axiros and there are more if you check out their webpages, I hope you'll be giving them a try because it's definitely a Lasting advantage.
    Comment if you have something to say or Like and Share with friends!

    Wednesday

    Managing Multiple Certificates, The Easy Way


    As a fledgling business, the need for multiple SSL certificates is slim to none, but as you grow and expand, chances of needing further certificates, from a standard, EV or Wildcardcertificate provider are highly likely.

    Now we may ask, What is SSL?
    SSL is an acronym for Secure Sockets Layer, this encryption technology was created by Netscape. Hence we can say SSL is a technology which creates an encrypted connection between your web server and your visitors' web browser allowing for private information to be transmitted without the problems of eavesdropping, data tampering, or message forgery. That's a brief description from Wikipedia.

    Now, to enable SSL on a website, you will need to get an SSL Certificate that identifies you and install it on the server. The use of an SSL certificate on a website is usually indicated by a padlock icon in web browsers but it can also be indicated by a green address bar, I believe we now have a clear understanding of the acronym, let's proceed.

    SSL cert

    During the start-up stages, a small business will probably only have to manage one website and could apply for the SSL certificate to suit that project and be done with it. Managing one certificate and its public key infrastructure shouldn’t present much of a problem and, as long as you know a little about what you’re doing, you should be able to do it yourself with the help of a Certificate Intelligence Center

    The problem is, Businesses Expand – which is a nice problem to have! However, websites multiply and more SSL certificates have to be installed. Before you know any different, it’s become a little overwhelming for you to control, particularly with everything else on your to-do list. Hiring a systems administrator is a common thing for business owners to do and these technophiles have the sole responsibility of managing the servers, PKI and SSL certificates. 

    When it comes to managing multiple SSL certificates, many administrators recommend the use of a Managed Public Key Infrastructure which makes the management of these certificates a doddle. Whether you need to look after 10 or 1000 SSL certificates, you can do so with a MPKI system, as well as coping with S/MIME digital identities and Open Financial Exchange certificates. 

    MPKI allows automatic renewal of SSL certificates which can save a huge amount of time, while using the Symantec MPKI will also give you the benefit of using the Norton Secured Seal of trust – something that will help instil further confidence in both your staff and potential customers. 

    Make sure that you consider MPKI if/when you expand your business to the dizzy heights where you’ll need one. It’ll save a lot of hassle and will make the whole process a cinch, for easier expansion. 


    Saturday

    Content Marketing Resources You Can’t Afford to Miss!


    When you plan to market and promote your business or any other thing online, then you need content marketing. If you are in the initial stage of your business marketing and promotion, content marketing helps your brand or business to get recognized in your niche market. You could be in a lonely position if you fail to find any kind of resource and support to carry out the content marketing task for your brand. The fact is you could find lots of content resources and guide, which can help you in carrying out this task without any worry or hassle. These resources would help you in giving an edge to your skills and knowledge pertaining to content marketing. Let’s check some of the best resources that you cannot afford to miss about content marketing.


    The Content Marketing Institute


    This is among the best resource and guide on content marketing, which is supported by an effective community blog wherein you could find a number of informative posts, articles and research papers coming on this subject from real time professionals and experts on this subject. Besides, you could find a number of events, conferences and webinars at different junctures wherein seasoned content marketers share their ideas and mantras about this subject. Their magazine- ‘Chief Content Officer’ is free to subscribe, which come along with comprehensive stuff on content marketing.

    Must Read: 3 Reasons Your Business Needs to Use Email Marketing List

    HubSpot


    It is a blog, which offers content marketers good resource on this subject and that too for free. You could find a number of ebooks, articles, blog posts, etc. on various aspects of content creation, promotion, distribution and marketing in simple and lucid formats, which are very much helpful to the novices. Their tool called Marketing Grader is a worthy tool, which help you in knowing your strengths and weaknesses about your content marketing strategy. All you need to do is to put your company’s site or blog URL and it will give you a details report about your online marketing efforts along with giving tangible suggestion to improve your strategies.


    Alltop Content Marketing


    Another good resource for content marketing where you could find insight articles and posts on this subject along with finding the latest news and trends going inside content world. The digital library over Alltop is an incredible place to find comprehensive stuff on content marketing and its effective strategies from seasoned marketers.

    Emarketer.com

    This is a digital marketing research company, which produces loads of useful articles and resources on digital marketing trends, content marketing, statistics and several other relevant issues. You could find a couple of original research work on this subject along with getting other informative articles and guides. Going through the different research work and statistics give you enough reason to find an edge over your content marketing strategies you adopt for your blog or site.

    SEOmoz

    It is among the most effective resources on content marketing apart from other subjects like search engine optimization and other online marketing methods. You could find a number of interesting and useful stuff over this place. As content marketing and SEO go hand in hand, hence SEOmoz cover both the subjects in a most comprehensive manner, thus giving you enough opportunity to explore and master these subjects.

    Final word

    Though you could find several other resources on content marketing, however, the above named ones are among the best sources of exploring this subject in and out. And as you start exploring these resources, you are more likely to get an edge over your content marketing strategies.

    Friday

    Create Facebook Pages for Blogger Or Website

    Facebook is not just a social network, it also comes with Pages that lets you build a closer relationship with your audience and customers, besides this, it is also becoming a good source of traffic especially for your website, after visitors browse your site, you would want them to come back and stay connected since these people spend time on the social network, this is the essence of creating a facebook page.
    On this post, I will be sharing my own fast and method of how you can go about making facebook fanpage for a website, probably, you are a blogger, or or you own some other website, go through this steps I have below to set up a fan page and get it up in your site as soon as possible:

    Facebook Pages

    First, Go HERE , there are other page types like:
    • Local business, place, Company, organisation, institution, Entertainment and so on, but since we are creating a Page for a website, you are to go for Brand or Product. Something like the Screenshot we have at the top-left.
    1. A List of categories will show up when you click it,  just scroll down to where you have Websites, select it
    2. Type in your Page Title, make sure you Agree to the Terms of Service, once you've done this, then you are through, but it doesn't stop here does it?
    3. You can Import contacts in your E-mail or Invite friends to like your new page.
    4. Also include a brief description of the page in Edit Page Info section.
    5. Click Save and you're set.
    6. Make sure you invite and tell friends to Like your Page afterwards, also keep posting useful quality content in the page to keep it active and interactive for the Fans.

    Monday

    How to Use NOTEPAD to Save Text Files In Any Format & Extensions

    As we know, Notepad is a plain text editor, that would Normally save your texts in ".txt" extension.
    To launch this application, hit your Windows Start button >> All Programs > Accessories, there you'll find it.

    Notepad

    There are many other text files your Notepad can open for your use in editing,
    Examples are:
    .xml
    .js
    .html
    .php
    .css etc
    a few DOC files (Microsoft Documents) and many others.
    But then, if you EDIT the file and want to "Save As New", you're likely to have come across a problem, it keeps saving with default format.

    Just the other day, I downloaded a JavaScript file ( .js ), I Opened it with Notepad after doing what I wanted to inside the script, I needed to save it in ".js" extension, unluckily it was rather saving as ".txt" which is the typical extension Notepad uses to save its files.
    I needed it to be in its default extension, so it could work on the webpage I wanna use it for.
    After saving as *txt, I tried renaming the file extension, removed only the *txt in the file name, yet, the typical file type REMAINED a *txt file.


    If you experience such difficulties,

    Here's how you can Save a File in its Default Extension, or save to Any New Extension you want using NOTEPAD

    > Click the Save As New
    > Move down  to "Save as File Type" just below File Name, Click "All Files"
    > Go up to File Name Again, Write the any name you want to give the file > put a dot sign (.) after the name and include the File Extension (i.e myJavascriptfile.js , myFile.html or MyFile.xml etc)
    and Hit Save
    Notepad windows

    It will Save it by the File extension you gave it.

    Found this helpful? Or got questions, leave a comment or say thanks by Sharing with friends.
    Peace!


    Friday

    Google Adsense still not Accepting You? Your Niche could be the Problem!

    Google Adsense... the definition, history, & what you can do with it is not new to us, so let's move to the main point, which is How Your Niche is Affecting you "Getting Accepted"
    Having read lots of issues and topics on Adsense, getting Accepted seems to be the most viral, people are quite desperate to own a Google adsense account under their own name.
    At the moment, getting accepted into the Google adsense program seems to be very difficult for newbies, especially when you get rejected the first time you applied.
    But then,  let's face it, there are so many reasons why people get rejected right? I had been through that road before, even when you correct those things Google assumed wrong, they still reject you over and over a thousand times, so I had come up with the ideas and tips to help you and I get accepted or Increase your Chances of getting into the Program.
    Quickly Glancing through this 15 killer Tips To Apply for Google Adsense. Though my blogger friend mentioned about 8 tips, I stamped THE FIVE PRIMARY TOOLS needed for you to be Accepted are,

    1. Privacy policy, 10% important.
    2. About Page, 15%
    3. Your Real Name and Email verification, 15%
    4. Your design or website layout - 10%
    5. Your CONTENT, 40% the most important!

    I know I didn't mention Traffic, which is quite important too but from my analysis, YOUR CONTENT carries the most important value, (your content will bring traffic).


    LET'S TALK ABOUT YOUR CONTENT...

    The quantity of posts you have published may not be the case of your disapproval, the QUALITY is what really matters ( hope I'm not the first person saying this).

    Adsense loves Niche blogs!

    These days, Google base their tests on your content as soon as you apply, content describes your blog and help them know what kind of ads to place on your blog, you would be doing yourself a whole lot of good if you place your blog on one certain Niche.
    There are thousands of niches to choose from, it all depends on WHAT YOU KNOW OR LOVE TO WRITE ABOUT.
    Now this leads us to another analysis we would be using
    Top 6 Most Competitive Niches you should know:
    • Make Money online
    • Social Media
    • Health
    • Technology
    • Web Design
    • Fitness
    These are great niches, the only cool thing I see in those niches is the Traffic aspect, you get lots of traffic when you post Popular topics under those niches. Now look again at the title, they are the most COMPETITIVE, so if you decide picking one from the above, you are likely to face difficulties being accepted on Google Adsense.
    I put up the Above for you so you can choose wisely,
    Choosing a niche is the best strategy I ever knew that get Gets you Accepted! it worked for Me!

    WANNA GET ACCEPTED ON GOOGLE ADSENSE?

    FOCUS ON YOUR NICHE!

    MY STRATEGY...
    Just like everyone else, I loved tech alot, I was born into the blogosphere reading tech blogs, I had all the stuff it took to be accepted, Interesting posts, nice design, traffic, everything, yet for more than 6 months, Adsense continued to Reject my application.

    NEXT THING I DID...
    I realised it was my niche that was holding me back! Yes, since it's a very popular niche, a competitive one, I had to move to something that's not Popular, yet liked and Accepted by Google, then I started my second blog, I took my time, got a template,customised it, two months later, with only 80 - 100 Pageviews daily, the blog Hit PR2, and got accepted at First Trial!!!

    CONCLUSION.
    If you believe your Blog is perfect, have you made good research on your niche? Is there competition? Is it a blog that discuss topics so many people are already waving about?
    If your answer is "Yes" to more than one of these questions, then your niche should be the reason why you're not Accepted yet.
    Starting A fresh blog with niche of Low Competition would be a great idea
    Low competition Niches you may try out are:
    * Arts, Comics, Fine arts and comic reviews
    * Education, Rare Job opportunities,
    * Motivationals, Quotes, fun facts with Jokes etc... these niches do have competition but it's moderately Low and trust me if you can handle niches/keywords with Low competition, you'll definitely rank High with more valuable earnings.

    Wednesday

    How To Back Up/Download All Your Blog Posts & Comments (For Blogger/Blogspot Users)

    The Blogger / Blogspot platform from Google had been very dependable by its users for a very long time now, unlike Wordpress which uses Hosting to run their platform, Blogger is cheaper to control and does not require hosting, so we hardly ever get issues concerning our blogs, still we have to accept the fact that anything can happen to your blog anytime without your notice.

     
    blogger back up all posts and comments


    So many bloggers have lost their blogs in different ways, some were due to their own mistakes, others, were for unknown errors that can best be explained by Google.
    Meanwhile, as an inspiring professional Blogger, there are certain IMPORTANT Activities and Check ups you need to be doing periodically, Backing Up your entire blog is one of them, in this post, I'm sharing with us how we can do it, so you can
    - Save a Complete copy of your entire blog posts and Comments in your hard drive
    - Upload the posts to a new blogger blog, or add the posts to a Pre-existing one, it's really Simple.

    • Login to your Blogger Dashboard
    •  Settings >> Other >> you find - Import blog - Export blog - Delete blog

      blogger back up all posts and comments
    • To save all the copy of your blog posts with comments Click Export blog
    • To upload the entire blogpost to a New one after saving to your hard drive, click Import blog
    You've worked hard writing and publishing unique stuff for your audience, this hard work needs to be secured at all time, I hope this post helped.
    Do Share with friends... Peace!

    Thursday

    Most Updated Version of Windows, Windows 8!

    After Windows 7, Windows8 is the latest version of Microsoft windows operating system. It was created by Microsoft for use not only on tablets also for use on personal computers. You can use it on your personal desktop, laptop and also on business desktops. It is taken as the developing version of the windows7. Its presence was first exposed at CES 2011 and its existence was pursued by the primary release versions. This operating system was exposed to designing on August 1, 2012. It was exposed for using general purpose on October 26, 2012 and this operating has some significant changes. It started its way with changing of operating system platform.

    The Great User interface

    The developer of this operating system gave a great attention for improving its user experience on many devices like as mobile, tablets etc and it is launched to compete with other mobile operating system like as Android, Apple’s iOs etc. it also got a new touch friendly shell and operator friendly interface associated on Microsoft’s Metro structure language. It is consisted of new touch screen facility with a grid of dynamically upgrading tiles of icons that offers to visit the application. The start menu of earlier versions of windows is replaced by the start menu. You can find a forceful expression on touch screen input. In this operating system you can also find the new windows store which helps you to buy application which is supported on this operating system.

    Facility of New technology

    Windows8 has the facilities of new technologies like USB 3.0 and advanced format with great speed. It also has the cloud computing and near field communications are added to it. It also takes advantages of low power ARM architecture and it comprises new security features of antivirus capability which is built in this operating system.

    Giving Secure Boot Facility

    It also allows a new installation process in a pleasant circumstance for digital distribution and also allows the secure boot. It supports the synchronization of certain apps and allows the settings between more devices. The improvement of security was positive and its performance development is also positive. The GUI of this operating system is full of innovation and creation. The user interface of this operating system has been broadly criticized and from the beginning of this operating system, its 60 million licensed have been sold in all over the world.
    In this operating system the start screen is so attractive and tiles on the start screen are used to communicate with the people, apps and other files or folders. The portion of the tiles is changeable with the latest info and it helps to update you.
    If you want to know something then you can sign up with your Microsoft account to any of your PCs running windows 8. You will find you in a fast and comfortable environment by using this operating system. You can browse whatever you want from the start screen and you can download photos, videos from the store.

    Find Any kind of Music

    The Xbox Music app is included in it through this you can listen any kind of music from the music world. The operating system is full of innovation and creation so you can find you in a pleasant environment by accustoming it.

    About The Author:
    Margaret is a writer/blogger. She loves writing, travelling and reading books. She contributes in KEL Attorneys. Check here for more on KEL Attorneys