Wednesday

How to Find/Convert a website URL/Address To I.P Address

I recall way back in year 2010, when I was still a Newbie, I learnt different methods of creating my own tweaks for browsing free on my mobile phone, the method of converting a web URL/address to an I.P address was not left out, especially for us who could only browse on mobile using modded browsers and applications, all for free.
So I thought this post would be helpful to some of us one way or the other.
A good question we should ask ourselves is this...
What is an I.P address?
 I.P Address meaning Internet Protocol address is a set of 4 numbers (xxx.xxx.xxx.xxx), it identifies a computer(s) connected to a particular server.
There are basically  two types of I.P versions, which is the I.P v4 and I.Pv6

Why Convert a URL/web address to an I.P address

There are so many reasons why we should convert a web address to an I.P, especially if the URL is a proxy address, you might be needing to convert it just to make something work on your mobile, PC or any other device.

How to Convert a Website Address/URL to an I.P Address

  • Simply go HERE 
  • Enter the URL of the website, and Click Get I.P 
  • The next page you get willdisplay the I.P address of the web address/ URL you entered.
For example the screenshot below is showing the I.P address of  daveproxy.co.uk ,  which is a proxy website.

 You can also convert an I.P address to a web address here

Monday

How to Install New Fonts on your Phone using Flip font for Symbian OS

Ever had a feeling of being able to Install a new-stylish font on your Symbian mobile? Perhaps, you are bored with seeing the same default fonts on your phone everyday, well, this Flip Font Application will DO that for you, and its very easy, all you gotta do is Run the app, choose the Font you want, and install it. Just like we do on our PCs

Flip font is the perfect app to make this possible for you, The application allow users to personalize and enhance their phones, making them more appealing, cool and exceptional to use.

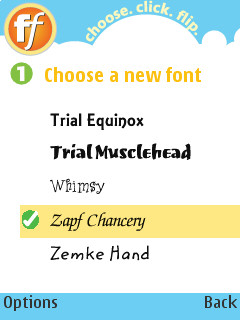
After installing the App, you can browse fonts currently installed on the app and select a typeface from the list to be used by the phone. In the mobile application, you'll find few various fonts already inside, but the bad news is that they are all Trial fonts, you are allowed to use them for only 48 hours, then  it expires.
But the Goood news is I will be giving us a pack of cool free fonts which you can install and use for life.
  • First, DOWNLOAD the application >> Flip fontv3SymbianOS.sisx
  • After installation, you can pick  from the list of trial fonts in it

How to Install More Fonts to and use them Free

*REQUIREMENTS*
The Flip font app creates a folder in your phone's C: drive, this is where all the fonts will be stored and used application by the application.
When the above are ready in your phone, then you can proceed with Steps on how you can add the free fonts below:
1. Open the X-plore, and use it to locate where you downloaded/saved the 65 fonts file in your E: drive (memory card)
2. Open/Unzip it, you see a list of Fonts. The first font file format ends with .in2 and second ends with .ttf
e.g : Alleycat.in2
         Alleycat.ttf


3. Mark the first font (e.g Alleycat.in2)  by Pressing Menu > Mark > Selected
     Do the same for the second

Hint 1: You may also mark them by Holding your ( # ) and Select button

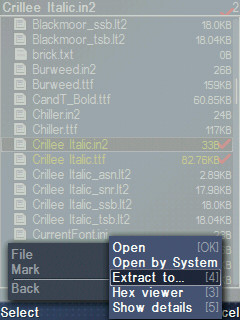
4. After marking both, Press Menu  >> File >> Extract to...


Now, go to your C: Drive >> data >> Flip font , then Press Select button to Extract the selected font files

Hint 2: Ensure you don't press the Select button until you get to the Flip font folder so as not to Extract the fonts to the wrong folder.
To navigate and open folders in X-plore, use your navigation button but don't press the middle key (select button) till you get to the right folder when extracting files, otherwise, like  i said before, it may send it to the wrong place.

5. If you have succesfully extracted the font files to the Fonts folder
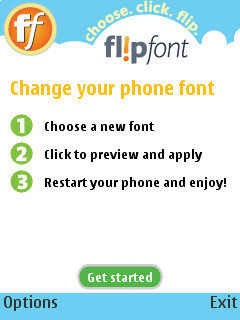
You can now open the Flip Font application, click Get Started, Scroll  down, you'll see the Name of the Font you just added via X-plore.


6. Select Use this font, close the Application


7. Switch phone off and On again to start using the font.

Enjoy!!!

Saturday

How to Insert AddThis Share buttons below every Post on Blogger

In order for your blog visitors to easily Bookmark, or Share your contents with other popular websites like Facebook, Twitter, Google Plus, E-mail to friends and so many others, hence Increase Traffic and more popularity for your blog/website. Inserting this Addthis Share button Plugin/widget is one of the most powerful ways you can do this..

Addthis is one of the world's most popular Social Bookmarking and sharing tool millions of websites use. It allows easy Sharing and Bookmarking for your visitors, the buttons are also very much customisable and you can also track your traffic and audience, so you can know who is sharing what content on your site by using its Analytics.

As we can see, I use it on this blog website. Enough of the description, let's get to know How we can implement this great tool to every post on our Blog.
There are so many ways of inserting it into your blog, but this one works just great


1. First, go to the Addthis.com website, Choose the Style you want to use, and Click "Get This" pop up will tell you to register an Account, it's fast and free

After registration, get and Copy your Code

Now Login to Blogger, If you want your visitors to Share your website/blog homepage, simply go to to your Dashboard >> Layout >> Design >> From your Page Elements, Select Add Gadget, then Paste the Codes and Save, then choose a designated place where you want it to be on the blog home page.


To Insert The Addthis Share Buttons to every Posts On blogger
  1. Visit AddThis.com, They will give you 2 codes to apply, the first code will be at the </head> section and the second code will be the Addthis Share button code.
    Copy the 1st Javascript code they will give you, paste it above the </head> section in your Blogger template. You can find it Using CTRL+F on your Keyboard, Find the code: </head>
  2. For the Second code, again Go to your Dashboard >> Layout >> Design >>Edit HTML
  3. Using CTRL+F on your Keyboard, Find the code: <data:post.body/> 
(i) If you want the buttons to appear below every post, Paste the Addthis Codes just below      <data:post.body/>

(ii) If you want it above your posts, then paste the Addthis Codes, before <data:post.body/>

Incase you have plenty of this "<data:post.body/>" already in your template and don't know where to paste your Addthis codes, you can find   <div class='post-footer-line post-footer-line-1'/>
Now paste the codes there using same instructions in (i) or (ii)
I guess you have put the codes right? Wait,  Don't Save yet, Click Preview to see if it comes out well, if it doesn't then I suggest you Read from instruction one again, but if it showed up as expected, you can Save your Template.
If you experience any difficulties implementing this buttons to your blog/website site, we will gladly help when you drop your questions in the comment box.

Monday

Create and Publish Blog Posts directly from Microsoft Office Word

Microsoft Office Word is not just an application you use for typing documents such as memos, letters, letter heads, legal copies, or reference documents, you can also use this Application to create and publish your Blog posts, and you may even find using it more interested, few reason may be because you are bored using your Dashboard,  you aren't used to creating your blog posts from the  Dashboard or you are a "Ms Office Word Typist freak"  who wants to blog without leaving the Microsoft Office Word Application that you are very much used to.

Blog with  Microsoft Office Word

 We would be using the Microsoft Office Word 2007 version as reference for doing this, it seems to be the most popular around. You must have an internet connection to use it since you would be Signing in  and uploading photos via the application. Here's how you should blog with it.
  1. Open your Microsoft Office Word 2007
  2. Click the Menu Icon >> New >> double Click New Blog Post 
  3. A Pop up will show telling you to Register a Blog Account, you can choose to Register Later if you want to start blogging immediately, if you choose Register Now,  the blog Registration Wizard will open, all you have to do is Choose your Blog Provider from this List: Blogger, WordPress, TypePad and so on.
  4. After choosing your Provider, Sign In with your Login Details,
  5. Next is choosing to Upload photos to your blog post, if you don't want to upload photos to the blog post, you can simply skip the steps below by clicking "None- Don't Upload Pictures" then click OK to Sign in so you can start creating and publishing your posts.
    NOTE: Please take note of the Notification Message that pops out telling you

    When Word sends information to the Blog Service Provider, it may be possible for other people to see that information. This information includes your username and password.

    I haven't heard of bloggers' Account hacked or Hijacked simply because he/she was blogging from MS Office Word application but if you are not okay with this, simply click NO, still, this shouldn't discourage you from going on blogging with the Application.

    How To Upload Pictures Along with Your Posts On Ms Office Word
    As mentioned in Step 5, you can Upload photos to your posts, after giving your Login details, the picture option will come next, Click My Own Server.


    After you select My own server, type the URLs for uploading and for displaying images.
    • In the Upload URL box, type the address that you use to upload pictures to your picture provider's server. This can be an FTP or HTTP address (i.e web address like Google Images), depending on the server configuration. Using your browser Copy and Paste it in the Upload URL.
    • In the Source URL box, type the HTTP address that is used to display the pictures. The blog post will use this address as part of the IMG tag in the HTML of the blog post files.
    As soon as these URLs are correct the photo will be uploaded Successfully along with your blog post.


    Thursday

    Airtel Bundle Tweak Updated For April - Get Free Airtel Data Bundle Now

    Airtel Nigeria is at it again, two months ago I posted tweak which would fetch us  a bundle data of 25MB for free, I'm not sure that tweak lasted up to 48 hours, now I don't understand if it's some kind of secret promo for their users or something, just this morning, a generous friend of mine called me asking if I have this Tweak, I said No, so he shared it with me, I tested it and it worked immediately.


    So i decided sharing the tweak with you,
    Simply Dial  * 141 * 13 * 1 #

    You instantly get 10 MB worth of Data bundle to browse with for 7 days, Free!.
    Redialing it for a data bundle Top Up doesn't work if you are thinking of doing that. And it works just once on every Airtel SIM.
    It's Still a good one since tweaks are pretty hard to get nowadays right?

    Don't forget to Share this with friends that need it too if you found it helpful. Use our Share buttons below this post.  Enjoy!!

    Wednesday

    Reset/ Format/ Resurrect Your Nokia with Hard Reset, No Internet or External Devices Needed

    Sometimes our Nokia fones, especially Symbian, can start becoming too slow than it supposed to, it cannot run properly as expected, these problems may be due to Internal Memory or/and MicroSD Card, which i will explain at the end of this post.

    Months back, I had this cool application called Flip font which some of us, Symbian users know well about. Then, I had very little knowledge handling it so when I toyed around with some folders, using X-plore while I had this Flip font stored in my phone's internal memory, the C: drive got corrupted and my phone Crashed,  it went off and couldn't boot On again. I use a method called Hard Reset, though there are two ways you can Reset your mobile.

    • Soft Reset: clears pending errors and bring your mobile to its initial state by restoring factory settings. To do this, the shortcut is: *#7380# 

    • Hard Reset: you can use this if soft reset proves not working, and the errors still remain in the phone,  doing a hard reset takes 2 ways, just enter the code: *#7370# and press Yes to confirm.
    Or you can press a combination of buttons (this is the last option to take in cases where the phone refuses to Boot),also known as RE-flashing or the "3-Finger Salute" and it works most various Symbian phones.


    NOTE:  Ensure you back up your files into your Memory card since doing this would format/delete all data in your C: Drive (Phone's Memory)
     
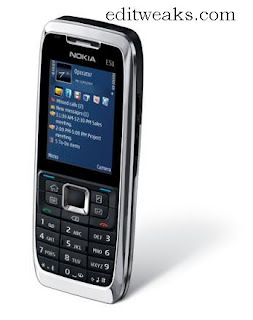
    Working on Nokia E51,  E63, Nokia E5, N95, N81, N73, E65, E51, E55 (Symbian V3 and V5 phones)
    Remove and REinsert the battery.
    Hold the following buttons *, 3 (number button) and Talk/Green key.
    Now press the Power button on the phone, do not release those buttons until you see the Nokia boot up screen. once you feel the phone power up you can let go off the power button while still holding all three button.
    working on Nokia 5800XM
    Use the following buttons to do a hard reset on Nokia 5800XM, press and Hold GREEN/ RED/ CAMERA keys all at once, then Press power button. this will only work on 5800's that have firmware version 20... and up. )

    Summary

    The good thing about this that it turns restores your phone back to factory Setting, making it seem like it's New, but the ugly  part is that you will loose your Files, if not all.

    What you Should know about what can make you Reset your Phone?

    Internal Memory

    When the phone's ROM (Read Only  memory) get almost full, there are no more spaces to store caches from your browsers, apps, receive Messages/files and so on,  it would definitely alter the speed at which it operates.
    * Make your external memory (Micro SD) your primary Storage since it has more space for saving data
    * Ensure you don't install malicious applications inside your phone's primary memory, it would easily harm the phone's system.
    Keep the internal memory strictly for data which can only be pre-installed in the internal memory by Default, such as caches, firmwares, cookies etc.

    Micro SD Card Memory

    * Same matters of slow operating system will arise when your memory card gets full, in this case, deleting some files might be the solution.
    * Do not always go for Micro SD Cards (MMC) with very high capacity, if your Manufacturer recommends a 3 Gigabyte Memory card for the phone, then use it that way, ignoring such recommendations to go for more might later end up crashing the phone.


    Friday

    Restore Lost Files in Avast Antivirus Security Software

          If you have Avast, one of the worlds most popular Anti-virus Software running on your computer system, then you certainly must have come across a critical issue whereby this software starts to frequently detect viruses in your Files, and automatically moves them to the Antivirus Chest. The bad news about this is whether these files truly contains viruses or not, this software doesn't wanna know anymore. Making one feel frustrated.

         I had been through an exact situation using the new Avast version 7, i am not sure of why it happened, maybe it's because I updated the Virus Definitions or something, but I tell you, I felt quite bad, because I was loosing files that were relevant to me, I was confused at first, yet the fact remained that except I perform some operations in the Avast Security Software, there's was no way I was going to get these Files back.
    Now, if you find yourself in the same situation like me, you should do what I did to get them Restored back to my PC.

    Here's What I did:
    • Launch the Avast Security Software, you can also find it by Clicking your Windows Start button >> All Programs, you'll see a list of all Programs installed on your PC, take a closer look at the list, you'll find it. The software opens displaying Summary with Updates...
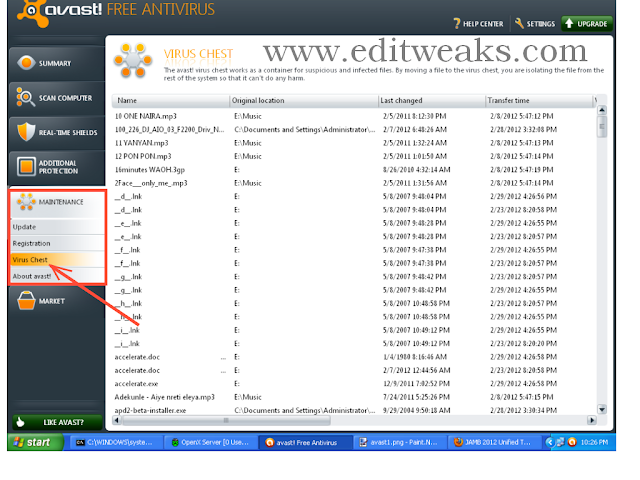
    •  Click MAINTENANCE
    • Right underneath it, you find Virus Chest, click it


    Here you'll find a list of all the files you lost that the Avast software had moved to Chest, simply select the file, right-click your mouse, you see an Option telling you to Restore it back to your System, click it, then your lost file(s) will be successfully recovered back to where it was before.