Friday

Easy ways To ByPass Problems Signing Up On Yahoo!

As most of us know, Yahoo! comes with great site features like Mails, Messengers, Jobs, Horoscopes, Movies, omg!, Flickr, and so on, and you are not fully authorised to participate in  these Services without owning an Account with them.
In most cases, I have experienced people having difficulties Signing Up on Yahoo!. They would normally try at least 3 to 5 times before their Registration becomes Successful, perhaps you have experienced such too.
Well, the truth is that I had helped people Sign up for a Yahoo! Account at one trial and it was successful, you too can do it.
Assuming you are using a PC, to do this, you surely have to bear some measures in mind, or else you'll find yourself trying to Register again and again,  even though you are providing them with the right Details they need.


Ways to Easily Bypass problems when Signing Up for a Yahoo Mail or ID are: 
  • Allow the Registration Page to load completely: I wouldn't recommend you sign up for a Yahoo account if you have a poor connection because this might affect the content of the page, hence alter your registration progress.
  • Ensure the time on your Device is Correct: Ever seen a Question popped out a Yahoo registration asking you;"Are you from the future?", this question comes up from the side of the box where you give them your Birthday details and it is a good example of what would stuck up your registration if the time on your Device is wrong. Be certain your time on your device or computer system is correct to avoid such.
  • Use Simple E-mail addresses/IDs with Strong Passwords: Your e-mail address must not include any space between the characters, any part of the name you are using to sign up for the new account, and should be kept simple for your use and the length the password should be nothing less than 8 characters, try to use signs or numbers in the passwords, you must keep it personal and be able to easily remember the password any time.
  • In case you forget your ID or password... : You will always see this on while Signing up for a new Yahoo account, make sure the details you give in Alternate Email(optional), Secret Question 1 and Secret Question 2 and genuine and can always be provided by you in case you forget your ID and password. This will make signing up and retrieving of your account faster for you.
  • Ensure your brower's Images are On: since Yahoo Registration displays Security Captcha, make sure the image view is turned, specifically if you are trying to sign up using your Mobile. This will avoid them telling you had typed the wrong codes in the image.

With these few tips, I believe you find Registration on Yahoo much easier. Like I had mentioned earlier in this Post, Signing Up on Yahoo at one trial is very possible.

Wednesday

How to Type On PC without Keyboard

         A Computer system without a keyboard, as many people think, is as useless as a cooker with no gas, seeing a computer system with no keyboard gives an instant feeling that you cannot do anything with it.
About a week ago from the day I created this blog post, I was with my colleagues in a cafe, one of them got stranded because I had removed the keyboard from the system he was going to use and plugged into another PC for something else.
   Looking  at this situation, it's hopeless, he can't do anything, but, after a few searches, I rendered a tremedy to find this good feature which people may not know exist on their computers, so if  for some reason you don't have an available keyboard to use, following this easy Steps with the screenshot below will give you hints on how you should go on typing on a Computer, even at the absence of a keyboard:


  1. Go to your Windows Start button
  2. Click on All Programs
  3.  You will see a list of all Programs in your Computer, right on above, you will find Accessibility, now  click it.
  4. Next, you see the last list from which you find the On Screen Keyboard, click it. 
 The On-Screen keyboard Opens for you to use

Extra Tip: Perhaps a key is faulty or missing on your keyboard, you may find and type it using this virtual keyboard too.

Hope you find this little tip helpful, you can share it with friends using our Share buttons below.


Thursday

5 Great Ways to Begin Your Next Blog Post

Before I set my fingers on keyboard to type this, I thought of the Title, "5 Great ways To Begin Your Next Blog Post". Next, I opened a new tab and typed a few Keywords into Google's Search Engine, "Ways to Begin a Blog post", though the keywords I typed on the Search engine and the Title of this Post seems so similar, most results on the first page consisted on how you can  
>>Go to To your Dashboard,
>>Click new Post to begin a new blog post and all that... , but hey, this is not what I'm discussing here, rather we will be moving to something very much more important than that.

Let's face the fact, if not uncountable, there are Zillions of blogs published everyday, yet only about 21% of these blogs world wide really know how to start a post in a such a great way that would be appealing to readers, hence make them read more and come back for more.

You can go ahead, take few seconds and read this post again from the beginning, did you notice what I did? How I got you to read past the first paragraph, even the second, well, that's what I'm talking about in this post.
Just as they say, "First impressions matters most in Life",  the quality you give to the first paragraph you make on a new post is important, it will determine whether your readers should go on reading it to the very end.

It doesn't matter what niche you are blogging about, after reading this, you'll be able to literally ''Copy & Paste'' the techniques to your own posts, and hopefully gain better results,
below are 5 Great Ways to Begin Your Next Blog Post.... Or Adjust the Older ones.
  
  • Ask a Question
Asking questions is one of the easiest, surest and captivating way of beginning your posts, you can check out or recall other blogs you have visited, they use this technique and you enjoyed reading from them because it worked.
Using this method is not just a simple way of getting started but also a way of attracting your readers to read more.
A good example of this method of starting a new post is this Question:

“Do you ever wonder if the positioning of the elements on your website are really making any sense?”


  • Start with a Quote

Yes, I know starting with a quote feels like you are some public speaker, preacher, motivator, or some high school student given an essay to write. Quotes in your posts can go further than you actually think. It is a great way of opening a new post, and of course, there should be quotes for a reason, that reason is what your readers would like to know about, thereby keep them reading that post to where you put a full stop.
You can take a look at this 

"Our business in life is not to get ahead of others, but to get ahead of ourselves"


  •  Go against The Rule
Ever seen a write up beginning with strong sentences disagreeing with what every other person believes? It brings a kind of little shock or big surprise as you read the line right? Now, applying this technique also give your readers some sort of curiosity, making them doubt and ask themselves questions which will only be answered if they continue reading the post.

for example : "Blogging about how to make Online cash is the best niche that yields the most pay from blog sites, I say NO, it's not true".

  •   Go On and Tell a Story
Everybody loves stories, I do, and bet you also do, the method of opening a new post with a short interesting story really goes a long way keeping your readers involved, especially if it's Real.
You can tell them how you went to a nearby super market, then to the electronics-section where you bought a gadget which is precisely the topic of the post you are discussing with them.
I have used this technique to begin my posts several times and it worked for me.

"It was about 6:35am in the morning, when I woke up from sleep, I took my phone, I had no expectations of seeing something that would be so amazing as I browsed Facebook Mobile, as usual, I saw much Notifications"

  •   Be Short and Direct 
Again, take a snappy look at the way I opened this post down to this very point I'm rounding it up, there's no big deal about it, rather it's just one of the ways from those I had mentioned in the list above. The one thing you have to do is keep it short, simple, and neat. Drop something you want your readers to get out of the article, then, they will be interested in knowing how they can get it.An example is just like the title of this same post,

"5 Great Ways to Begin Your Next Blog Post"

Hope you pick one or more out of these tips and apply them. Your readers are expecting better posts from you.   Happy Blogging!

Saturday

EdiTweaks Wins A Free Custom Domain via OgbongeBlog.com

            It was about 6:35am in the morning, when I woke up from sleep, I took my  phone, I had no expectations of seeing something that would be so amazing as I browsed Facebook  Mobile, as usual, I saw much Notifications, I normally would go for the ones that mattered most, like notifications telling me somebody posted on Bloggers Lab, a Facebook Group I personally joined late November, 2011.
         This time it was one of the "PROs" that posted, so I had to check it out, only to discover that ''He'' was asking for the owner of editweaks.blogspot.com, the blog you are reading this from now. A few others had commented on the post, he said he liked the look of the website and would give the owner a Custom Domain for Free, what do you expect? I had to quickly claim it.
After a couple of processes, he helped me get the custom domain running in no time, so here are we, from editweaks.blogspot.com to www.editweaks.com.

     Now you must be wondering what is this generous pro website? Well, he is Ogbongeblog.com
The young man behind this great website is Jide Ogunsanya, he is the Founder and CEO of Ogbongeblog.com and OgbongeSMS.com , he had been in the game for quite a very long time and has been a very Successful Personality in the blogoshere of and around my country. He works with top telecommuncations, along side other Nigerian Internet professionals and business experts. His blogsite, ogbongeblog.com is where he shares his personal interests which goes far and wide to different people around the world.
Ogbongeblog shares stuffs on
  • Internet Marketing
  • Web/Blog Development including ADSENSE INTEGRATION
  • SEO Optimization (Making your site/blog rank well in Google and other search engines)
  • Link Submissions
  • Social Media Integration/Marketing (Facebook, Twitter)
  • Graphic Design
  • Blogger Blog restructuring (custom domain name, split headers/footers and more hacks...) 
  • Tech Consulting
  • Seminar training.....to mention but few, including Freebies Fans like me that Won this Custom domain from Him.
You can give that site a try, you sure would get something good from it, something which may be even bigger than what I got.

  Dear readers, you can join, It's Official, EdiTweaks.com is saying a very Big Thank You to Ogbongeblog.com for helping him move to the next Level.


Wednesday

How to Take ScreenShots using Opera Mini

First of all, I would like to refer you to this Post which tells us how we can take Screenshots of anything displaying on our phone's, it's very much easier and flexible but it's only for Symbian phones, but this post will tell us how to use the World's number One Mobile browser, Opera Mini to take Screenshots of webpages as we browse with it.
It will be beneficial especially to those using s40 or other phones different from Symbian, though the Opera works on both s40 and s60 phones, a very large advantage of s60 over s40 phones right?.
And... Yes, there are many Operas that can take screenshots, this one seems to be the easiest to use, I'm talking about Opera mini Mod 4.21 beta9HandlerUI by the same great modder called Sir Handler.

Description
* This Opera Mini app is in J2ME platform (.jar file format)
* It has been Modded incase you have an FBTweak to make it browse for for free
* Screenshotter embedded, which is the main reason of writing this post.
* File size - 420kB. Don't worry so much about the size, it runs perfectly well on s40v3 phones and Upwards.


How To Take ScreenShots Using This Opera
First,
After downloading and Installing, Launch the Opera, follow the steps below if you wanna take a Screenshot of a particular page while you are browsingit.
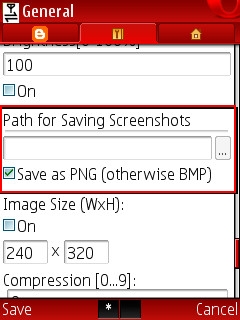
First, we are gonna choose a path where all our Screenshots will be stored, you can choose to store them in your Gallery or MMC.
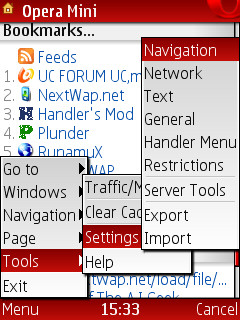
  1.  Go to Menu >> Tools >> Settings >> General
  2.  Scroll Down to where you find "Path for Saving Screenshots"
  3. (a.) Edit the Box and type  E://   as your Saving destination if your're going to be saving all screenshots in to the Root Folder of your MMC (memory card)
    (b.) Or you may Edit the box and type C://data/Images if you want it stored right in the images folder of your phone's Gallery, but if you don't understand this, you can simply open and choose the path by clicking the box next to the one you can type in.
  4. Save the Setting.
  5. Again, go to Menu >> Tools >> Settings >> Navigation
  6. Scroll down a bit, you'll find "Shortcuts", Click on Edit, you'll see a Numbered List of Shortcuts 
  7. Scroll down to Number '44', where we have Screenshot/Empty 
  8. Now, click it, an Action will pop-up, Press the desired buttons (screenshotter Keys) which will be taking snapshots for you while browse,it should be a maximum of 2 buttons.
  9. Save and we are done
Here's a Screenshot of this site's mobile page view which I took using the opera


I actually chose to use the ( * ) button for taking my screenshots in my Nokia 3110c, an s40v3 phone, so you can take that button as a reference when choosing your own screenshotter key.
Remember if you found it helpful, perhaps, someone out there could be needing it too, use the SHARE buttons below, and as I would always say, it takes nothing less than 5 seconds to share.

Tuesday

How To Take Screenshots with Symbian OS (s60 )

Ever wondered How people get Screenshots of different scenes on their Phones? Especially internet tutors. They show you images like Menu, Wallpapers, or any other path from their phone's display system, just exactly the way it appears on your phone, well, here's the Tip, they use an Application called Screenshot.

This App takes Screenshots of anything currently displaying on your mobile phone. It's so flexible that with it, you can take a screenshot of another App running on your phone and it's only for most Symbian OS (s60) mobile phones.

Here are some screenshots I got using the Screenshot app:


Screenshot for Symbian OS (S60 3rd Edition) version 3.01
Supported devices: Nokia 3250, N71, N73, N75, N76, N80, N81, N82, N91, N92, N93, N95, E50, E51, E60, E61, E61i, E62, E65, E70, E90

Screenshot for Symbian OS (S60 3rd Edition) version 3.03 - UNSIGNED
Supported devices: Nokia 3250, N71, N73, N75, N76, N80, N81, N82, N91, N92, N93, N95, E50, E51, E60, E61, E61i, E62, E63, E65, E70, E90.
Screenshot for Symbian OS (S60 1st/2nd Edition) version 2.50
Supported devices: Nokia 3230, 3600, 3620, 3650, 3660, 6260, 6600, 6630, 6670, 6680, 6681, 6682, 7610, 7650, N70, N72, N90, N-Gage, N-Gage QD.

If the none of the ones we have above doesn't work for you, then you can get this one from SourceForge.net . It works on almost any symbian OS with a File size of about 240kB.

Saturday

Ways To Zip and UnZip Files with Your Mobile

Unlike some mobile phones users, PC users have been opportuned to Zip and Unzip their files using softwares that had been pre-installed in their systems.
     A few days back, a friend was showing me some pictures which he had to upload to a file -sharing website, they were all in .jpeg format, most sites would display .jpeg, .png.or jpg files (images) without you download it but he didn't want the site users to see what was in this .jpeg files except the users downloaded it, now, the solution to making this happen for my friend was to ZIP the file.
Another case I used to encounter months back was how to Upload Java Applications which were usually .jar formats directly from my Mobile phone. Still, the solution was to ZIP it.
Till date, few of us still have problems Zipping or Unzipping Files with our mobile, so I thought this post would be of help in some little way to somebody out there.


How To Zip and UnZip Files


There are various File Editors that can zip and Unzip Files on mobile,
For J2ME (s40 Java) phone users, I Recommend you use
After downloading, installing and opening this Application,
Use it to find the File > when you find it > Press Menu, you will find options telling you to Compress as Zip (if you want to Zip it) Or Unzip the file if that's what you want to do.


For Symbian mobile users, I recommend you use
Though new Symbian phones come with the GZipman utility that helps you unzip files, this Application seems to be the best and most used editing software for Symbian users, it does a whole lot more than just Zipping and Unzipping files.
To zip your Files with Xplore, Go to where the File is located in the list,
press Menu > Scroll down to Zip > Copy to zip (if you want to keep the Original)
OR > Move To Zip (if you want to Zip the Original file without leaving a copy of it)


How To UnZip and Install .jar File formats

I will be using Blue FTP as an instance for doing this, let's assume you downloaded a .jar file format that had been Zipped, all you need do is open the Blue FTP, locate the file in your phone Directory and keep Unzipping each folder you see in the Zipped content until you find something like a file name ending with ( _jar )

*Press Menu Or Press 1 (Copy)

*Go to another directory where you want it to be and Click Extract Here (Or Press 3)

*After the extraction, close the Blue FTP. From your phone directory, Locate the file you just extracted with the Blue FTP , Rename the file from xxxxx_jar to xxxx.jar Press Enter, the jar file should now be ready for Installation. That's all

NOTE
You only need to replace the Underscore ( _ ) sign with a dot sign ( . ) meaning you rename it by replacing _jar with .jar
for example: ae3dedm_jar
is replaced with: ae3dedm.jar ( Ensure there are NO spaces between the characters)

Extra Tip:
If You use Opera Mini Browser or any other and you want to download a .jar file directly in the Opera without the Opera Launching your Default mobile browser.
Go to > Online Zip converter
The site generally converts almost all file types to Zip, simply paste the download URL of file, or Upload it directly and Click Convert file to convert it to .zip format.
If this post was helpful, Don't forget other friends might need this too, so please do take a Few seconds To Share it.

Wednesday

How to Convert Your Personal Facebook Account to a Facebook Page


When I finished writing this post, I reviewed it and realised I had pointed out two great ways it would help us,
  1. Which is the main post,  How to Convert Your Personal Facebook Account to a Facebook Page
  2. A Trick behind the Post that will Help you fetch more Fans to like your Page, Fast, free, and without stress.
Now, some Facebook users who Signed Up for a Personal profile may later have a need to reach out to more than they could keep as friends since Facebook allows one profile to have a maximum of 5,000 friends as at the time of my making this post.

So, if you fall into the category of those who want to Share and connect to/with more people, the best option for you is to convert your personal facebook profile into a Facebook  page, facebook pages permits an almost unlimited amount of people to stay connected to, unlike Personal or Individual profiles.

      Pages offer more robust features for organizations, businesses, brands and public figures, maybe, you have been friends with one or more Public figures like Artistes or Speakers only to realize after sometime that this personal profiles whom you once sent Friend Requests or otherwise have suddenly changed into a Facebook page with thousands of Fans, well, this is exactly what this post will be discussing.


How Do I Convert My Personal Account To a Facebook Page?
If you would like to Convert your personal account to a Page, Click Here
This action is called the "Profile to Business Page Migration"
After this conversion, your facebook website address (vanity URL) will be the same, then, all your profile pictures are exported and all your facebook friends automatically become people who have LIKED your new page, these are the only things that are carried along, NO other contents will be moved.
So, be sure to have saved all your important contents such as Notes and Messages before carrying out the Migration.
  
According to the Facebook Help Center:
To avoid losing important content, Facebook recommends taking these steps before you convert your personal account:
  1. Download your profile (timeline) information. You can download a file that contains all of your sent and received messages and all of the photos and videos you’ve uploaded to Facebook.
  2. Appoint a new group admin to any groups you manage. The account you’re converting will lose these admin rights during the conversion process
When all the above notices have been put in mind and under taken, then you can go on converting your Personal Account to a Facebook Page.
Incase you accidentally converted your profile to a page, You can also reverse your newly created page back to  your Personal Account again by submitting a request for a reversal here.

NOTE: You must bear in mind that using Pages as if it were personal profiles for Individuals is against Facebook's Statement of Rights and Responsibilities, which means, after converting it into a Page, you must use and maintain it as a Page, not as a profile.

But hey, the second part of this article like I mention in the first paragraph, there's a little tip or do I say, Trick about this Post, People frequently ask,

 "What's The Little Trick Behind Facebook Pages with many Fans?"


If you wonder how some New pages you just discovered seemed to have grown with a sudden huge amount of fans without waiting for a long time to get them, Or If your aim is to create a facebook page with plenty of fans who have Liked it without going through the stress of buying these fans through third party sites, well, here's the Tip.
  • Create a Facebook profile with a Name it mustn't necessarily be your real name, but ensure the name you choose to Sign up with is Proper, because people would prefer connecting with Profiles with names that sound Human, than they would if you created a profile with the name of your Business or Brand.  You can even choose Female as the Gender of the Profile, generally, people would accept Requests from females, especially guys, Hence, increase your chances of having more friends, that's another good tip eh? LOL
  • When you are done creating and Verifying the Profile, then you can start Sending Friend Requests like crazy, but Hey, you will need to be careful with how much requests you send, Or else, you get a Ban from Facebook since it's against their Laws, so Send but don't send too much or too frequently, perhaps 7-10 Requests on every 4 or 5 days interval is okay.
Keep up with the tips, then your number of friends will grow efficiently, then you can later go on Changing the Profile into a Facebook page with plenty of Fans that had already Liked it.