Saturday

Filter & Delete Mail Floods with One Click

Lately, I subscribed to Facebook E-mail Updates forgetting I would be receiving excess E-mail updates about my Facebook accounts, these mail was getting unbearable as it came in daily, consuming high bandwidth of space given to me for all my data use and storage.
Same issues are experienced when we subscribe to get from other sites, sometimes this can be so annoying especially when your Inbox is flooded with unwanted mails that gets mixed up with the innocent ones, thus, making your Inbox look disorganised.

The problem now, is to Delete all these Unwanted flood mails without hurting the innocent little mails that got entangled with unwanted mails in my Inbox.
I actually used Hotmail.

Marking them one by one to delete later, was going to be too difficult, because I would spend the whole day marking thousands of mail sent by a sender.
Sweep, and Move tools wasn't a good option either, I needed some mails to remain in the Box without Deleting.

After few experiments, I came up with an idea that would us delete Unwanted flood mails with one click.
Let's Do it!
  • Sign In to your Mail box
  • In the Search box field, type in the part of the Name of the sender (minimum of 2 to 3 words e.g facebookmail.com) & hit Search.
  • This will filter out all the Mails sent to you by the contact.
  • Now go to your mail-box tool bar, and click All, to mark all the mail results hover your mouse to the DELETE link and click it. see? The mails are deleted all at Once.
This same tip is applicable to other mail service providers like Gmail, Yahoo Mail and many others we use everyday, it's your mail box, you should have control over it. Hope this helped you to keep it tidy.


Tuesday

Surest Way to Stop or Opt-out from Etisalat Blackberry voiceplan

Just last month when the etisalat DNS Tweak was working and going rival, users extremely enjoyed it coz it powered almost all Symbian applications, now the tweaks has recently been blocked, users gave up.

The big problem now is users are complaining that their #100 is been deducted each time they recharged, and this is really rendering their credit useless since the tweaks isn't even working anymore. Anyway, if you somehow have fallen into this situation, there's a way out.


How to Opt-Out from your Blackberry Voice Plan

1. Make a recharge of #200, at least
2. The #100 will be deducted leaving only #100 left in your account balance.
3. Now dial *399*2# to opt-out, immediately the Blackberry voice plan will be stopped instantly.
After then, you can start recharging again without having fears of your money being deducted without your consent.

NOTE: If tip number 3 didn't work for you, then try Migrating to the Etisalat Easy Cliq plan by dialing *244*1#
Found this post helpful? kindly take a second to share it with friends who also needs it. Thank you

Saturday

How to Set Up a Custom Domain for your Blog with Domain Registrars like Syskay.com

So you have successfully created your blog, the layout is okay, you have put some contents in it, and one way or the other you are getting traffic so all that's left for you now, is to make blog address a Custom Domain, hence change it to www.mywebsite.blogspot.com to www.mywebsite.com, but somehow you don't how to go about it.

Earlier this year, around March, when I won my Custom Domain,  though the bills had been payed for, after  registering, I still had to set up the Custom domain for the blog website so it could be up and running as soon as possible, I had to go through few simple steps.

syskay systems

I chose to use Syskay systems because
  • Easy to pay (especially if you reside in my country, Nigeria)
  • they are reliable with High performance, which is the chief essence of using a good web host. I hardly ever get error issues with them.
For a list of other web hosts and registrars you may want to try out, then i suggest you read this blog post
    So, if you've made up your mind to use Syskay, then you can use the steps below to make yourself a custom domain with it.

    DISCLOSURE UPDATE About using SYSKAY: After few years of using Syskay domain registrar, I was totally disappointed at how they handled my request when this website had Domain DNS problems (from 26th July - 8th Aug). This site went down and Syskay was unable to help out as they boldly told us we are on our own when it comes to DNS issues, this is poor in 2016 to realise they don't even have such a very IMPORTANT FEATURE known as DNS Service for domains. 
    I suggest you use GoDaddy or 1and1 when buy custom domain. Unlike Syskay, they have more features and will help out if you have problems. 
    You're at your own discretion if you go ahead to choose Syskay as your domain registrar after reading this.

    Here's a Step by Step guide on

    How to Set Up (Register) a Custom Domain for your Blog with Syskay.com

    1. First, you will need to have a domain name to use, this is going to be your identity, for example www.mywebsite.com,  you might wanna check out a quick guide about how to choose the right domain name for your blog or website here.
    2. Go to syskay.com

    3. Scroll down to the footer (bottom) of the webpage where you find DOMAIN REGISTRATION (No Hosting) or simply click HERE

    This takes us to the page where you will put the domain name you have chose in Step 1.
    Input the domain name and search, if the results say the Domain is Available then you can go on and buy it. by clicking ORDER NOW

    4. the next page is  the Shopping Cart, with Domains Configuration & NameServers.
    ns1.syskay.com
    ns2.syskay.com

    Kindly don't touch or change those nameservers, leave them as they are, and click Continue

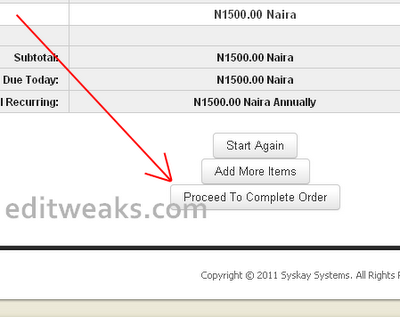
    5. Next page has a lots of options but no need to get confused or worry about filling them. Simply hover your mouse to Proceed to Complete Order.

    syskay systems


     5. Now you are taken to the registration page, on Completing your sign up, your Batch number and other corresponding details will be sent to your E-mail.

    6. Use this Batch Number and the custom domain name you gave them to make Payments. After this, wait for sometime for your Custom Domain to be activated.

    How To Know When your Custom Domain is ready

    7. Simply visit the Address of your custom domain. It may tell you Server not Found but keep trying till you get a Google 404 Page Error.
    Once you see that, it means your domain is ready. Now you can proceed to the last part.

    8. Login to your Blogger Dashboard

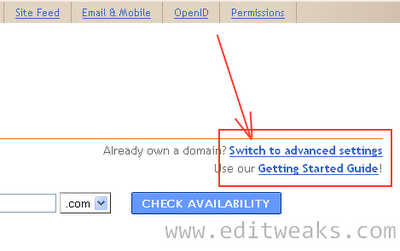
    9. Click Settings >> Publishing >> Switch To Custom Domain

    blogger

    10. Go to the the Advanced settings page, put the domain name there, tick the Redirection box and Save

        Congratulations, your blog is ready!

    Thursday

    Synchronize all Phone Contacts To SIM (For Symbian mobile )

    If you had saved all your Contacts in your Symbian phone, and you insert a brand new SIM card into it, the phone would normally ask you whether to copy those contacts saved in your Phone to the new SIM Directory or not, and if you skip this Step, finding it again can be a bit of a puzzle.
    Here's the quick & easiest Tip on how you can go about it.

    Synchronizing all saved Contacts in the phone to new SIM Card.

    1. Go to Menu >> Contacts
    2. Press Options >> scroll down to where you see Mark/Unmark >> Choose Mark All (choose this option to Synchronize all Contacts)


    3. Again Press Options

    4. Scroll down and Press Copy >> To SIM directory (choose Memory Card if you want it stored in the memory card)


     There! All your Contacts are now successfully saved in your SIM card, now you can always carry or find those Contacts even when you replace that SIM into another phone.

    Saturday

    When is a Blogger Stepping Out of the Line?

    I wasn't in a good mood when created this post, it's about something I had been ignoring for quite a long while, so just before it gets too much, I felt a need to belong to one of those Bloggers may have pointed it out to their audience. Though I'm not taking it personal, I may be very strict on the issue because this is what I see my fellow Bloggers do.

     Just this morning at a Facebook Group for Bloggers, I got pissed off discovering a blogger making a carbon-copy of his fellow Blogger's Design on his blog, all without the original owner's consent, I don't know what motivated the Copier to take such action, but I believe he stepped on the toes of the original owner of that great blog. Sometimes I even wonder why we should call such persons a "blogger" if they are not having or developing the qualities that makes them one.
    There are Primary Filthy things A blogger should never lay hands on.
    That's why with the little experience I had gathered within tiny number of months I joined the blogosphere, I will be giving us some answers to a very important question, we bloggers should be asking ourselves.

     So, WHEN IS A BLOGGER STEPPING OUT OF THE LINE?

       Similar but much different from 6 Reasons you're going to fail as a blogger, Here's How to Know you are Doing what you are not Expected to Do. Believe me, if you find yourself in one or more of those answers below, as a Blogger, you won't go far.

    blogger stepping out of the line

    AS A BLOGGER, YOU STEP OUT OF LINE...

     1. When You don't Enjoy Writing what You Know

    Yes, Bloggers should love sharing knowledge through writing, now and then, not only writing, but writing what they know and enjoy, without blinking twice. You don't just pick up your keyboard (pen and paper) and start writing about anything... "only-heaven-knows".

    Choose your niche and remain there. That's a quality that makes a professional in his category. More so, the moment you start thinking there's nothing else to blog/write about, forget it, your blog will crash. If you're still pondering on what is a niche and where you belong to, I suggest you check out  this post. After choosing a niche, whether you survive there or not is another tempting decision you make yourself.

    2. When You are not Original

    Just as every human being is Unique, so are our blogs should be unique, including our posts and designs, coming back to my second paragraph about the copier, maybe he derives joy in copying another guy's stuff because his blog looks great, but he failed to ask Himself, Did the Original Designer of the Great-blog Copy from someone else?
    I bet the answer is a NO, so what stops a copier from being Original?
    We all have that one great blog we wish could be ours but the fact remains, we can always create something bigger by ourselves, a content with complete originality, either out of nothing, or out of pieces of broken bottles if you understand what I mean ;)
    Copying people's stuff is not an option and will never be. You can, You should and must stay original.
    Fail to take this advice, you may end up with Answer 3 below.


    3. When You Start Copying Contents

    Take it or leave it, Content is the most important thing in every blog, as we must have heard before, "Content is king". Your posts are meant to be very Original, and not expected to be seen elsewhere. Some bloggers go wrong by rushing to make blog posts, this impatience cause them to copy people's hardwork. And when you do, you have stepped outta the line. There's a quote my blog friend once tweeted,

    "To steal ideas from one person is plagiarism, but to steal from many is research"

    it's kinda funny, I see value and usefulness in the quote, besides, you must have come across Copyrighted articles and stuffs right? Yes, every owner of a content has Copyright subjected to him and only him, except he gives you authority to use his content, you may get penalised by Google or your own web hosting account once you're reported for copying his stuffs.
    Therefore, the rule remains if you can't seat down and write your own thing,  you are fired!!!

    4. When You Talk About Fake Experiences on Real Life Posts

    Major cases are found in high paying keyword Tutorials like Flashing computers, Phones, or other related articles on Operationg systems like Windows, Linux, Mac, Symbian, iOS, Andriod etc.
    As Bloggers, most of us are required to blog on something we have been through, you step out of line if you tell your audience how to sail a Canoe when you haven't even entered one before. Who knows what hell you might fall into when they come back asking you questions about the blog post, you know you won't be giving them right answers.
    An example of this was when I saw a Blog talking about how to cash an AdSense check, it was crazy coz he never had Google ads running on his site in the first place.
    Another example was a person blogging about how to make money online, though I never saw him make one himself. These are proofs that such bloggers are either impatient or they don't belong to the niche even if those niche/posts contained high paying keywords that drives in lots of traffic.
    Remember, your articles are like real life events, so if you've not been there, don't talk about it

    5. When You Fail To Confirm A Content Before Publish

    To keep this one brief, great blogs ain't completely so perfect without researches,  you have to do your own searches so you don't boast about the wrong thing, thinking you are right.
    Google, Bing, Yahoo Search, forums, blogs and many others are out there for you to search and confirm what you are looking for. Ensure you are certain that what you are talking about in a post is honest and has proof to back it up.

    In Conclusion
    Some of the answers seems like how you can begin a blog, but hey, I'm not giving us an orientation to Blogging here.
    I think I had discussed the major times bloggers are really stepping out of the line, you may fix or add yours if you know any I failed to point out using the comment  box is placed open for everybody. Don't forget to care and share!

    Wednesday

    How to Edit and Correct Your Facebook Photos 2018

    Few years back, even when facebook have become the biggest social network in the world,  though we could all Edit our Facebook photos and rename them, still our Dear Facebook website lacked the online tool that would help us correct our photos we had already uploaded . People would upload photos but realize it was not uploaded in the upright position, this could piss them off, next make them Delete this photo.

    All these have recently changed. Facebook is now having the tool, you can correct your photos online, so you don't need to edit them before uploading, be it portrait or landscape, all you gotta do is Rotate the photo till you get the desired position you want . And believe me, it's a dead easy stuff  you'll do in seconds.

    1. Login to your facebook account
    2. Open the uploaded facebook Photo

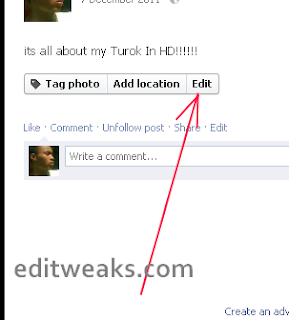
    3. Click Edit, you should find it at right hand of the page as we have in the Screenshot below, see it?


    editing your facebook photos

    4. Click Options, found right underneath facebook photo you are editing.
    The Edit Tool menu will come up with Add location, change Date, and of cause the Rotate Right or Rotate Left which you should click to correct the photo.

    5. In case you've also been looking for how you could change your profile picture, you can also choose the Make this profile my picture from there.

    editing your facebook photos

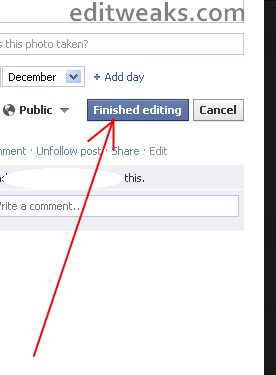
    6. Once you have rotated the photo to your desired position, click on Finished editing to save it.

    editing your facebook photos

    Hope you find this post very simple and explanatory especially if you are still a new Facebook user, why not say Thanks by sharing it with friends using our Social sharing buttons below? :)

    Friday

    Tag Cloud - A Useful widget? or A Mess To your Blog

    Tag clouds, also known as Labels is a very innovative way of unveiling the popular posts in your blog. According to Niche Website Strategy,  a tag cloud is a set of keyword terms  that are displayed as links to help your visitors find content more easily on a blog or website. More so,  I have seen many sites using a tag cloud and I noticed one thing in common with them, this widget  contained big, small, synonyms and other kind of words stuffed all over the area..
            
    As at the time I made this post, I even used this widget, just for the benefits, though there are side-effects about it which is what I am pointing out in this post.

    Tag Cloud, The Good thing About it 
    * It helps your website/blog SEO, generally, this is because your selected keywords linking to various pages in your blog are found in the tag cloud.
    * Encourages your readers navigate or follow through to other parts of your post/pages
    * Helps Google and other search Engines like Yahoo, Bing among the others to understand what keywords are the most important and popular in your blog, so they can index your pages on SERP, thereby increasing your PageRank.

    Tag Cloud, The Ugly thing about it
    Sincerely speaking, as I mentioned in the first paragraph, tag clouds can make your blog look messy coz of its big and small letters scattered over the place.
    * it has unattractive look, I think it should be the ugliest widget any blog can have
    * A mere gaze at it can strain a reader's eyes, especially when there are too much keyword stuffing, what I call "Tag Over-clouding"

    Here's a little Suggestion  if you consider using a Tag Cloud
    1. Since you have tags posted at the bottom of each blog post then do not use a tag cloud.
    2. you have categories already implemented on your blog or webpages, still I suggest, do not use a tag cloud.
    3. But if you don't have tags at the bottom of each article or no category listing any where on your blog then use a tag cloud.
          In conclusion, there are alternatives to this, if you want your Readers to reach the best content on your blog, use the Popular Posts widget, renaming a popular post  widget to something more persuading  for is very much accepted, so far you want your visitors know what's on ground they shouldn't miss as they explore your pages.
    The Question now is, do you use a Tag Cloud widget? Why? or if Don't use it, Why are you not? The Comment box is open for everyone to share their views on this.

    Connection Settings on Firefox: Fix and Improve your Proxy

    Mozilla Firefox, the number one browser with an estimated 120 million users around the globe has so many features some of us a yet to uncover.
    One of the most frequently asked is how you use your Mozilla Firefox to connect to the internet. Being aware as we surf the web, our privacy, security and of course freedom also matters.
    • Are you being blocked by websites for whatever reasons?
    • Perhaps, you want some Privacy
    • Or you simply want to go Anonymous by hiding your I.P (identity)

    Now, this post should put you through how you can bypass such blocked sites and answer the rest of those questions up there, as well as show you how to fix your Proxy settings so your Firefox browser can Connect you to the internet.
    Proxy Servers,
    in brief, is an application or computer system which acts as a go-between clients(devices) seeking requests from other servers.

    Actually, I did this little homework using Firefox 3.6.28, pretty old version isn't  it? LOL, but it's all same procedure and functions, so let's do it.

    > Go to Tools >> Click Options...
    > click Advanced and Go to the Network settings.
    click Settings

    How to Set your Firefox Connection

    From here, you find your Connection Settings, so you can configure how Firefox connects.

    How to Set your Firefox Connection


    1. No Proxy, using this option will put your Firefox internet connection on Default, meaning, it will use any remote server or access point to connect.

    2. Auto-Detect Proxy Settings. This option is good for those who don't know how to play around with proxies, select this, then your Firefox will retrieve available proxies, hence solve connection settings for you.

    3. Use System Proxy, as you may know, a computer may serve as proxy (host) connecting two or more computers, that's what this option gives you when you choose it.

    4. Manual Setting Proxy Settings, is where the tweaking takes place, choosing this option gives a full control over the way your Firefox will connect to certain or all websites visited.
    This Option lets you use HTTP proxy(HyperText Transfer Protocol)
    ,SSL proxy, Gopher and other various Proxies and Ports.


    How to Set your Firefox Connection

    To Surf the web anonymously with Proxy on Firefox
    The most used is HTTP Proxy, in the box, simply type in the URL or I.P of the Proxy address through which you want to browse the web with Mozilla, move down, click OK and you are good to go.
    You can find a handful of Proxy Addresses to use at:
    - hidemyass.com (recommended)
    - proxy4free.com
    - proxy.org
    proxy-list.org

    I'm sure those sites should have a list of strong HTTP proxies to make your Firefox work for you.
     If you experience issues with your firefox, don't fail to let us know about it, we would gladly help, meanwhile, you can say thanks by sharing this using our Share buttons below.