Sunday

Easy Guide to Download 360˚ video from YouTube for PC & Mobile (Mac, Android, iOS)

360 videos had been a huge success since it appeared on YouTube last year, and over time, more 360˚ videos had been uploaded and watched millions of times everyday, but what if you would like to keep or download the video to your PC or smartphone, to watch it anytime with your VR headset? Sure, You can download the 360 video to play the 360 video quality with your VR headset using PC or Mobile (Windows, Mac, Android, iOS).
I assume you already have a VR headset, just follow the steps here below:


Download any 360 video from YouTube for PC

This is the easiest method to download any 360 video from YouTube for PC:
1. Download the 360 video in the highest quality possible via existing YouTube download sites such as www.keepvid.com or Savefrom.Net once you have the MP4 file, you can play it back in a 360˚ Video Player

Where to Download VR Players for your PC:
In case you are looking for where to download a VR player for your PC, the free Kolor Eyes desktop player (for PC & Mac) is one of the best choice for that, although GoPro has acquired Kolor (the French software company who publishes it) so we believe there will be lots of resources for the software to get better and better over time. Go here to get Kolor player
Once you get those, you're good to go and enjoy your 360 video.

Really, it's just a matter of downloading the source file (commonly referred to as the "flattened" video file, or technically known as the "equirectangular" video file) and then playing it back through a dedicated 360 degree video player which knows how to map/wrap/project the equirectangular source file into a sphere for interactive 360˚ playback.


Download any 360 video from YouTube for Mobile (iOS and Android)

This is easy too, and almost same method as for PC.
Download the 360 video in the highest quality possible via existing YouTube download sites such as www.keepvid.com or Savefrom.Net , once you have the MP4 file, you can play it back in a 360˚ Video Player for Android or iOS.
  • VR Players / Apps for Android:
Get the 360 VR player PRO for Android >> Download Here 


  • VR Players /Apps for iOS: 
Jaunt VR >> Free | iTunes

Discovery VR >> Free | iTunes

Within >> Free | iTunes

There are more cool VR players pr Apps for those mobile operating systems which we may detail you in our upcoming posts.
Hope this post was useful and helped you play Youtube 360 videos  on your PC or mobile.

Thursday

How to Unlock a Chromebook with a simple PIN code

"Google now allows users to unlock Chrome OS with a PIN code and this will definitely come handy for touch devices", Google developer François Beaufort wrote.
The initial usual way of authenticating and safeguarding your Chromebook was to pair it with your smartphone to unlock your Chromebook device, but now a new fresh feature is on the test by Google on Chrome OS, this will enable users to be able to unlock their Chromebook with a single PIN.

Google developer, François Beaufort says the "Quick unlock" settings will soon be introduced in the regular Chrome settings page.


Here is an Easy Guide to set up the new function to unlock your Chromebook using just a PIN on Chrome OS:


1. Enable the flag - chrome://flags/#quick-unlock-pin

2. Restart Chrome

3. Head over to the Chrome Material Design settings page to set up your unique PIN for the Lock Screen feature

4. Under the new "Screen Lock" section, set up your unique numeric Lock Screen PIN

5. Finally, lock your screen with [magnifying glass key] + L

6. Now try out your new "Quick unlock" feature and unlock the Chrome OS using your new PIN code.
"This is a good move in the right direction," one user commented on the post. "However, I think that this PIN lock feature should be expanded to also include passwords. So the password is not linked to the Google account but a separate password just for the device."

Wednesday

Download 360 VR Player PRO 1.5.19 Cracked APK | Watch 360 Videos

This is one of the best VR player for Android. With this App you can play and watch 360 videos and Virtual Reality Videos if you have a VR (virtual reality) headset, it works for most Android smartphones running Android Kitkat or later versions.

360 VR Player PRO | Videos

This app plays 360 Videos and Virtual Reality Videos
Other Features of 360 VR Player PRO:

  • use 360 ° degree | panoramic | 3D mode | VR mode.
  • use Touch , use Motion
  • use device gyro sensor to navigate in the video
  • use Cardboard for Virtual Reality videos
  • play and stream videos online
  • use as Video player
  • play one saved 4K HD Video – Very High Resolution
  • share with friends

Note: Be patient VR takes time to load because of your internet connection.

How to install 360 VR Player PRO
  • Save the downloaded .apk on your android phone’s SD card
  • Run and install it
  • That’s it, Enjoy! :)

360 VR Player PRO Screenshots


Where to Download >>  GO TO DOWNLOAD 360 VR PLAYER

Tuesday

Infinix HOT 3 vs HOT 4 - The Specs Comparison

Today we will be comparing two Infinix smartphones in the HOT series, the Infinix HOT 3 and its new successor, HOT 4.
Before that, let's have a quick look back on these Infinix Hot series, starting from the very first Infinix Hot (X507) which smashed the market with whooping cheap price and lots of  sales, we can notice one thing as time went on, there were improvements in each successor.
Right now, it seems Infinix Hot 3 is still getting some good amount of attention while the Hot 4 is already available in the market, this comparison post may help you discover what the devices are made of, hence you can be able to choose:

Infinix Hot 3 vs Hot 4 comparison

Specs Comparison - Infinix HOT 3 VS HOT 4


Specs HOT 4 X557 X554 HOT 3
Camera 8 + 5MP Front flash 8+2 MP, Selfie with soft flash
Memory 16 GB ROM + 2GB RAM 16+1 / 16+2
Battery 4000mah + Fast charge + OTG 3000mAh + OTG
Processor Quad-core cortex 1.3GHz Quad core Mediatek 1.3Ghz
Screen size 5.5'HD 5.5'' inch HD full lamination
OS Android 6.0 Lolipop 5.1
UI XOS XUI
Sound DNC + Smart voice Dual mic cancelling noise for clear conversation , anti sound break , RNS technology
Colors Red, blue, champagne, green & black Black , red , Blue , white
Voice Smart voice Camera voice command
Security Finger print sensor
Network 4G LTE, 2G/3G 3G


In my opinion, the Infinix HOT 4 looks pretty better as a choice, a review of the device will likely come up in our subsequent posts.

Thursday

Infinix Hot 4 (X557) Released - Check out the Specs and Price

Infinix Hot 4 (X557) had been released and now available in the market for interested buyers who would like to experience an improvement in this successor. The smartphone carries similar design to the previous model (i.e Infinix Hot 3) but this time, packs better battery juice, finger print sensor, and a recent Android OS (Marshmallow) that is dressed by its brand new Infinix's UI (the OSX).

Something else that seem quite surprising, is to see how frequently this Infinix Brand keeps pouring out new models of their variants almost every 3 months. It wasn't up to a month the Infinix Hot S debuted.


Anyways, before we may come back with later review of the Infinix Hot 4, we have here, a quick Specification of the Infinix Hot 4 with the price.

Infinix Hot 4 - Quick Specs

  • Model : Hot 4, Infinix X557
  • Display: 5.5inch (720 x 1280 px)
  • RAM: 2GB RAM
  • Camera: 8MP rear, 5MP front camera
  • Internal Memory: 16GB ROM, 32GB micro SD
  • CPU: MT6580 (1.3GHz - Quad Core)
  • OS: XOS (Based on Android 6 Marshmallow)
  • Battery: 4,000mAh
  • SIM: Dual SIM micro
  • Extras: Finger-print ID, 
  • Connection: WiFi, HotSpot, Bluetooth 4.0

The new Infinix Hot 4 is here for price tag of ₦37,000, although there wear no teasers, pre-launch, no announcements or any usual manner of the Infinix Brand releasing this smartphones but it's already Available for you, if you're interested in getting it. >> BUY NOW - Click Here to View Price Offers

Sunday

Voicemail finally comes to Whatsapp for Android and iOS. Here is how to use it.

While the new that Whatsapp is ending support for Blackberry, Nokia and old Android/iOS devices come December, the Facebook-owned company is forging ahead with the development of the IM app for the devices still supported.

What I am trying to tell you essentially is that there has been an update for Whatsapp for Android and iOS, and while both have different version numbers (version 2.16.229 for Android and version 2.16.8 for iOS), the new update for both platforms comes with a new feature that is overdue; Voicemail.


When Whatsapp added the Voice Call feature for its app on all mobile platforms in 2015, there was a lot of excitement because the feature wasn't a common one in the mobile app world. Though the feature has been useful, there are times when you feel that it should be improved upon, particularly because the Voice Call feature is only useful when the second party is online.

That is exactly what Voicemail is coming to fix in Whatsapp. Thanks to it, you can now leave a voice message when a Whatsapp call to a user is not picked or answered, as opposed to the norm of leaving a text message in the same situation.

How to use the Whatsapp Voicemail Feature


When your Whatsapp call to a user is not answered, you will be presented with three options: Voice Messages, Call Again and Cancel. You already know what the last two options are used for, it's the first one we're concerned about here.


To utilise the Voicemail feature after a Whatsapp call is not answered;
  • Select the Voice Messages option from the three options.
  • Tap and hold the Voice Message button to start recording your message (voicemail).
  • When you're done recording your message, release the Voice Button button to send it, or swipe to the left to trash it and record another.

The message you record would be sent to the user as a voice note (VN). Considering the series of new features that are being released to Whatsapp almost weekly, the Whatsapp Video Call feature that has been in the rumour mills for some time doesn't seem to be far from us anymore.

Full Guide on creating a bootable MacOS Sierra Beta installer drive

All new software and software updates from  Apple are dished out to users through the App Store, and when the software to be downloaded is heavy, it can be a pain in the neck going through the usual process.

The situation gets even worse if you are managing multiple Macs and you have to install the software individually on each of them. You can solve this problem by making a bootable external hard drive for the purpose of installing the Mac Operating System (or any other software of your choice) on your Mac.


The next Mac OS to be released is Sierra, and there is currently a public beta version of the upcoming software that you can install to your Mac PC. So in this guide, I am going to show you how to make a bootable installer drive for the macOS Sierra public beta that's currently available, and we'll update the tutorial when the final version is released. If you need to create bootable drives for other software, shoot us a comment and we'll look into creating a tutorial for that.

Steps to creating a bootable drive for the macOS Sierra public beta


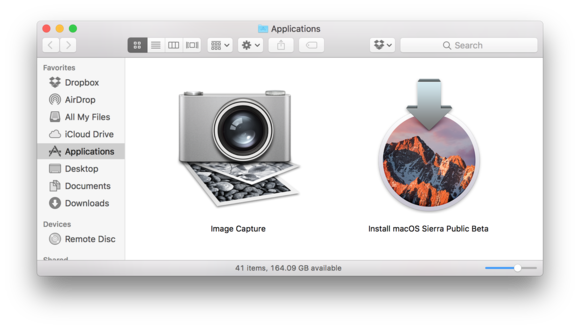
Download the beta installer for MacOS Sierra


Before you can download the Sierra beta installer, you have to be eligible to download the Sierra beta software itself. To do this, sign up for the Apple Beta Software Program, go to the Mac App Store, and download the installer.

After downloading the installer, it can be located in the Applications folder on your Mac. If you've downloaded the installer and installed the Sierra beta, you will notice that the installer can't be located again in the Applications folder. It is an automated process that deletes the installer after the software has been installed.

Because the installer is needed to create the bootable drive, you have to download it again. You can do this by opening the App Store on your Mac and clicking on the Purchased tab. Here the beta installer is included in the list of apps you've purchased. Click on Download and the installer will be downloaded once again to the Applications folder. To preventing the installer from being deleted again, quit it if it launches itself after the download is complete.


Prepare your External Drive


Get the external drive you are going to use to create the bootable drive installer. A hard drive as well as a USB Flash drive can be used. The beta installer takes around 5GB of storage, so you may want to make sure the drive you are using has that amount of free capacity.

The last step in preparing the drive is to change the name to Untitled. Also note that the storage drive you use will be formatted during the process, so try to copy important files to another storage location.

Create the Bootable drive installer

The tool used in this tutorial is Terminal. If you don't want to use it, you can use Install Disk Creator. It is just as good as Terminal. It can be gotten here.


Here's how to go about it:
  1. Connect the external drive to your PC. It is important that you rename the drive to Untitled or you could get confused in this tutorial. The name can be changed after creating the bootable installer drive.
  2. Launch the Terminal app. This can be done by going to Applications >> Utilities >> Terminal.app
  3. Copy this command >> sudo /Applications/Install\ macOS\ Sierra\ Public\ Beta.app/Contents/ Resources/createinstallmedia -- volume /Volumes/Untitled -- applicationpath /Applications/ Install\ macOS\ Sierra\ Public\ Beta.app and paste it into the command prompt in Terminal.

  4. At this point, you will be required to enter a password, which is your user password. Type it in and click on Return.
  5. You will be notified by the app that the drive will be erased. Type Y to confirm and click on Return to continue.
  6. Terminal will start to erase the connected drive. When the process is complete, you will be asked if you want to use the drive for Time Machine. Click Don't Use.
  7. Terminal will now start copying the beta installer to the drive. Allow the process to complete.
  8. When it's complete, you will see a Copy complete and Done notice. You can now exit the Terminal app. You have just created a bootable macOS Sierra Installer drive.
  9.  
Now that you have created the bootable drive, you may want to use it to install the Sierra beta software on other Macs. Follow these steps to do that.

How to boot a Mac from the bootable installer drive

  1. Connect the drive to your Mac.
  2. If the Mac is off, power it on. If it's on, restart it. While it boots, press and hold the Option key on the keyboard.
  3. Instead of booting straight to your default home screen, the Mac will display the Startup Manager which shows the boot drives available for the system. Click on the bootable drive you just created and click Return. Ignore the Choose Network parameter.
  4. The OS X Utilities window will be displayed. If you want to keep your data from the existing OS while installing the Sierra beta, select Install OS X. If you don't want to keep your old data, head over to Disk Utility and format the internal hard drive, before selecting Install OS X.

Congratulations. You have just installed macOS Sierra beta using a bootable installer drive.


Friday

Introducing Google Play Family Library: Share purchased content with friends and family conveniently

A new feature has been added to the Google Play Store, and it's called Google Play Family Library. It is a feature that allows you to share paid content (apps, books, video, audio, games, etc) purchased on the Google Play Store with family members without having to re-purchase it, and easily at that. The feature was supposed to be launched in July, and considering that the App Store for iOS already had a similar function since about two years ago, it's about time it got to Android users.

So how do I create my own Family Library?
Don't worry, in this article, I will guide you thoroughly on the steps you need to take to create your own Google Play Store Family Library and start sharing your purchased content to loved ones to use for free. Read on.


STEPS

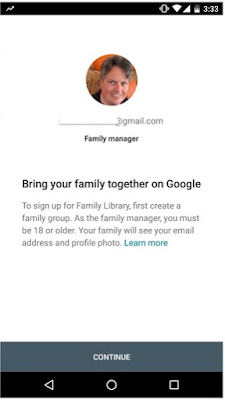
1. Sign Up


As you should have guessed already, you need to have a Gmail account to even have access to this feature at all. Once you are signed in to your Gmail account, you can sign up for the Family Library in two ways:
  • Through the Google Play Store app on your Android device. Open the app, go to Account >> Family, and tap on Sign Up.
  • You can also register using a web-based browser. Head over here to get started.

2. Add Payment Method


You have to add a credit card with which payment for all paid Google Play content purchased by any beneficiary in your Family Library would be made. For every purchase made, you will get an e-mail with details about who is buying what. Don't worry, you can set limits so that indiscriminate purchases are not made with your card. More on that later in this article.

3. Add content to the Family Library


If you've been making purchases on the Google Play Store prior to this time, you can choose to add those paid content to the Family Library so that other family members can download and use them for free. You may not want to share everything you've bought with the family (you know, teenagers-only stuff, or things that kid must not see!), so select I'll add them later, one by one.


However, you could be the type gunning for a non-existent Top Google Play Spender of the Year award, and have purchased a lot of stuff that you can't start adding them one by one. Simply choose Add all eligible purchased items and click on Proceed.

4. Add your desired Family Members


After sorting out what you want to share and what you want to keep private, it's now time to add the loved ones to share your purchased content with. You can only add individuals who have a Gmail account, are members of your family, live in the same country with you and are of age 13 years or older. You can add up to five beneficiaries.

To do this, type the name of the contact in the Add Recipients text field. A list of your frequent contacts is shown, and when you type names in the text field, suggestions will be shown so you can add contacts faster.
The contacts won't be added straight away; invitations would be sent to their e-mail addresses, and when they accept you will be notified via e-mail.


Each family member that accepts the invites will now have a new FAMILY LIBRARY section under My Apps and Games where they can see all the content you have added, and from there they can download them.


After that, every paid content that can be added to the Family Library will have its icon somewhere near their title, so you know whether you want to share it with the family or keep it to yourself.


4. Tweak your Settings

Now that you've added your family members to your Family Library, the next thing to worry about is your credit card and your privacy. Your credit card because everyone in the Family Library can make purchases on the Google Play Store with your credit card, even if they don't have access to its pass key. Your privacy because everything you buy will be made available to them all for free.

Thankfully, Family Library has a Settings menu where you can apply restrictions and control the content that the other members get, and the purchases they can make with your credit card. One thing to note is that each family member can still make purchases with their own credit card, so if you have someone who can conveniently purchase stuff on their own, kindly ask them to refrain from making purchases with your card.

To change all these, locate the Family Manager Settings menu. One of the settings you can customise is:
  • Require your approval before purchases are made. You will have to manually confirm approval when a family member wishes to make a purchase with your credit card. This setting can be customised for every individual in the Library, or applied generally. Useful if you have a shopaholic in the house.

  • Another useful one is

  •  Delete a family member. Has that family member been behaving naughtily? Simply delete him/her; it only takes seconds and some screen taps. Or do you have a grouse with that other adult in the family? You can take revenge without physical damages.
Though you can share a lot of things and virtually all paid content, there are still some intricate things you can't share in the Family Library.

Things you can share

All paid
  • Apps.
  • Games.
  • Books.
  • TV Shows. and
  • Individual Movies/ Movie Bundles.

Things you can't share

  • In-app purchases.
  • In-app achievements and progress.
  • Individual movies in Movie bundles. If you purchase a movie bundle, you can only share the entire bundle; you cannot pick individual movies from the bundle to share.
If you're using Google Play Music and Play Books applications on iOS, you can also partake in the family library.

What do you think about the new Family Library feature in Google Play? Air your views.

Wednesday

"Save Draft" function for Photo Editing might be coming to Instagram soon

A new phenomenon on Instagram has suggested that a "Save Draft" option for photo editing may soon come to Instagram. Towards the end of last month July, some Instagram users began to get the option to save their work as draft after pressing the back button while editing photos in Instagram.


Here are some joyful tweets by lucky users who have gotten the feature:


And many more got theirs this month:
However, when Tech Crunch reached out to the Instagram company, they confirmed that it was just "an experiment for the time being".

We’re always testing new ways to improve the Instagram experience was all an Instagram spokesperson had to say concerning the Save Draft feature.
Even though this might truly be a test and nothing serious, considering the level of joy users exhibited concerning the feature, Instagram might just rethink and decide to fully integrate it into the app. That is left to be seen, after all, all we can do is watch.

Apple has started releasing iOS 10 Beta 5 for developers

Just a few days after rolling out beta 4 for developers, Apple has started releasing iOS 10 Beta 5 build for developers. The roll-out started a few hours ago, and it is now known that iOS 10 is coming in September, hence the frequent beta releases.


The latest beta build comes with a lot of improvements and fixtures in areas including:
  • In-App purchases in the App Store.
  • Bluetooth iMessage.
  • iOS' interaction with Apple TV.
  • Phone and Wallet apps.
  • Accessories.
  • iPhone 6S panicking when using its Smart Battery Case.
iOS 10 Beta 4 also comes with some tweaks in some of the functions in iOS, including:
  • Photo app doing a new scan on launch due to its AI and facial recognition data being reset.
  • Music Control center tweaked (how? Wait and see for yourself).
  • Today now includes two new view tabs: Data and Day.
  • Widgets now have darker backgrounds.
  • Lock sound changed.
  • Voicemail transcription now available on iPhone 6S, 6S Plus and iPhone SE, all with an English-speaking Siri.
Beta 5 also arrives with a new app, and it's for kids. Swift Playgrounds is an apps with which kids can learn to code in a fun way.


However, some problems have not been fixed with the latest beta release, including:
  • FaceTime calls between iPhones running iOS 10 Beta 5 and Macs running the latest macOS beta.
  • Recently Played in For You not refreshing instantly in Apple Music.
  • Notes quitting instantly upon launch.
  • And other minor hiccups.
.If you are an Apple Developer and you are interested in iOS 10 Beta 5, you should already know where to get it by now.


Google Maps for Android now allows you to save offline map data to external SD Card


The latest update to Google Maps for Android smartphones is bringing two new features that might interest two different categories of smartphone users: the rich and the poor.


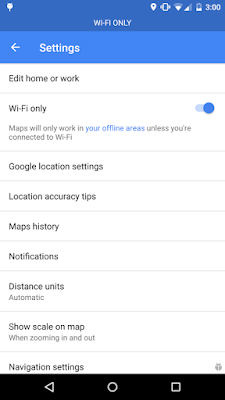
The first new feature is the ability to switch to using only Wi-Fi connectivity for location navigation. This comes handy in situations where you come across a free Wi-Fi network while navigating with Google Maps, and you want to save your mobile data.

To use this feature, simply grab the latest update on the Google Play Store using the button at the end of this post, slide to your Settings Menu and check the place where you would normally find Offline Areas; it has been replaced by a Wi-Fi Only option, which you can enable to stop using your cellular data and load your navigation data through Wi-Fi. This feature may excite those who have the capacity to purchase Wi-Fi data bundles.


Product Manager for Google Maps, Amanda Bishop describes a scenario in which this feature is useful in a blog post:

We’ve all been through this -- whether in our own backyard or a different country. You need to get directions, but you don’t have service. Or you do have service – but it’s spotty – so you find yourself staring at the map in a perpetual state of loading while you sit in your car waiting to find out which way to go. Now, when you know you’ll have spotty service or just want to save on data, you can toggle to “Wi-fi only” to use Google Maps entirely offline on Android.

The second new feature in Google Maps for Android allows you to download location and navigation data for offline areas to your SD card instead of the internal storage. This is particularly useful for those using low-end and mid-range smartphones that possess meager amounts of internal storage.

With this feature, you can now kill two birds with a stone; save for the rainy day when you have abundant megabytes for browsing by downloading map data for your frequent locations to your phone for offline use, and salvage the internal storage on your phone if you have an external SD card. Users of high-end smartphones with ROM capacities of 64GB and upwards won't be too concerned with this.


Amanda Bishop also described a scenario in which this is useful:

Entry-level smartphones come with internal storage capacities as low as 4GB, while higher-end models range between 8GB and 32GB. For many of us, that’s not enough for all the videos, music, apps, and photos we cram onto our beloved smartphones. To ensure that Google Maps users with any storage capacity can download and use offline areas when they need them most, we’ve added the ability to download your offline areas to an external SD card (if your device supports them) on Google Maps for Android. Now you’ll never have to choose between snapping more food photos or the ability to navigate offline.

To enjoy these two new features, you have to update your Google Maps to the latest version. Grab it in the Play Store using the button below.

Tuesday

$2500 Limited Pokemon Go Edition of iPhone 6S announced by Russian Company Caviar

The Pokemon Go craze is still on, and Russian company Caviar has joined in. The company has announced that it will be launching a limited bunch of iPhone 6S Pokemon Go Edition smartphones targeted at die-hard Pokemon Go fans who care less about spending their money on a mobile game.


The launch of these special editions of the iPhone 6S is expected to coincide with the official release of the Pokemon Go game in Russia. This seems imminent, as the game is already hitting key Asian markets.


The iPhone 6S Pokemon Go Edition is special for its exclusive back design which features a gold-plated Pokeball logo, while the rest of the back is engraved with Titanium.
The phone is going to cost a whopping $2700 (more than thrice the price of the standard iPhone 6S), and guess what? Only 77 units of the device will be made! The deal is further sweetened by an offer by Caviar: people who buy the phone will get a dedicated Pokemon Go account with all the Pokecoins an account could have, which means 14,500 Pokecoins worth $99.99.


If you are willing to shell out that amount for the phone or you are curious, more information about the iPhone 6S Pokemon Go Edition by Caviar can be found here.

What's your take on this?.


QuadRooter is a new vulnerability affecting over 900 million Android devices

A new security risk has hit the Android ecosystem, in the form of a vulnerability called QuadRooter. The discovery and disclosure of the vulnerability was made by researchers at security firm Check Point, and all of the devices affected have something in common; they are powered by Qualcomm chipsets.


According to Check Point, QuadRooter is a set of four vulnerabilities, any of which an attacker can use to root an Android device, trick users into installing malicious apps unsuspectingly and escalate the security privileges of those apps.
The vulnerability currently affects over 900 million Qualcomm-powered Android devices, including the Blackberry DTEK50 which bears the title of World's most secure Android smartphone. Devices affected include the:
  • Blackberry DTEK50
  • Blackberry Priv
  • Blackphone 1 & 2
  • Google Nexus 5X, 6 & 6P
  • HTC 10 and One M9
  • Moto X (2016)
  • Oneplus 3
  • LG G5
  • Samsung Galaxy S7 and S7 Edge
Check Point actually discovered the vulnerability back in April and informed Qualcomm, which released patches to OEMs of the affected devices. The patches were integrated into the July edition of the monthly Google Security Bulletin, but only three of the four flaws have been fixed, with the fourth to be fixed in September.
Check Point has promptly released an Android application in the Google Play Store that can check if your device is affected by the vulnerability or not. Download the app QuadRooter Scanner App here.


Perhaps if this had happened to iOS rather than Android and delayed till October, Check Point could have won $200,000 in the Apple Bug Bounty Program!.


Monday

Why Namecheap DNS Sucks and How to fix it for Bloggers

Wanna know why your cool Namecheap sucks? In this case I am referring to their DNS service, they messed me up, alongside Syskay (an old-school type of domain registrar), their features and security layers turned out to be nothing to write home about, they gave me terrible experience.
I'll also tell you how How to fix it incase you run into any of their DNS errors/problems (for Bloggers who use them anyway).

EdiTweaks was down for 2 weeks, Here's Exactly What Happened - Firstly, accept my apologies before I continue, I must confess to you that domain structures could be one of the most complicated things I had discovered recently, truly. But as each new problems come, I am learning to tackle them.
This blog was down for over 2 weeks (14 days, 336 hours), all that time used by you and other awesome visitors to come here and read our posts, this site was showing:

ERROR: site took too long to respond - ON FIREFOX

and on CHROME:

This site can’t be reached

editweaks.com’s server DNS address could not be found.


I tried everything possible to recover the website which proved null till I discovered it was a DNS Attack. 1st attack ever in my entire life, but what caused it?

See, NameCheap got no chill. I ain't registered with them, I only was using their FreeDNS service via Nameservers from my domain registrar (Syskay - they are terrible now), after a long while I didn't get alert Emails that Namecheap's FreeDNS service had been cancelled and had now turned Premium.
Without my knowledge, they went ahead, did their thing, made the FreeDNS open & vulnerable, then Lo and Behold, I got attacked, malwares & bugs all over the place, the domain started to redirect to malware and adware sites.

Even Syskay, my domain registrar left me helpless, those guys at Syskay are terrible, this is 2016 yet they don't offer a working DNS Service, if you use Syskay, I advice you pack up and Transfer your domain to a more serious Domain Registrar (with more features) as soon as possible or else they will leave you stranded like they did to me after several conversations. I may have once promoted their service few years ago, but I will disclose an excerpt of this recent experience as an update in that post.

Both Syskay and Namecheap couldn't do anything, I was left all alone. After hours of research, by this time the domain was completely offline (zero traffic), I was trying to understand the situation about how to resolve this kind of strange issues with my domain's and Google's DNS, some which included Public DNS Flush and checking for DNS Propagation.

At last, I transferred the domain to a better place while waiting for transfer propagation, I still went ahead to complain at a Google Forum, my domain wasn't their responsibility but I got quick and helpful responses from there.

It took a while for the whole servers located at different countries to sync in the propagation, and I'd say if EDITWEAKS' IP was initially located at United States, then perhaps like the screenshot below,


it must have traveled across various countries till it finally rested at its new IP in Germany, it's new home.

Anyway, We are back!
And if you're an avid reader here, we want to say Big Thanks for your patience.
I successfully fixed the ish, EdiTweaks.com is Live again :)

Sunday

Hack iOS and win $200,000 - It's the Apple Bug Bounty Program

A bug bounty program is one in which hackers from around the world converge to try to hack the systems of the company or organization holding the event. The hacking is not done with a bad intention, but is done to discover whatever vulnerabilities might exist in such systems, and the hacker(s) who discovers any such vulnerabilities goes home with a prize, usually cash proportional to the security and risk level of the bug discovered. Bug bounty programs are done to encourage more hackers to stop black-hat hacking and expose vulnerabilities in operating systems to the company manufacturing it.


Most big tech companies already have their own bug bounty programs, but over the years, Apple has managed to stand out in this regard as it does in its operating systems; it doesn't have a bug bounty program. Well, that was until last week, when Apple's head of security engineering and architecture, Ivan Krstic, announced at the Black Hat event that Apple would start rewarding hackers and security researchers who discover any security risk or vulnerability in its products.


The announcement came as a great surprise to the people present at the Black Hat event and tech watchers, because most of Apple's security announcements are made at its WWDC event, and the last time an Apple representative spoke at the Black Hat event was four years ago.


Apple's reason for refusing to launch its bug bounty program until now is the high level of patronage hackers get from government agencies and black markets for security flaws. I'm sure what was in the mind of the Apple representative that announced that was the FBI-Apple battle that played out months ago, in which FBI eventually bought the tool with which it hacked into the Sans Bernardino shooter's iPhone for nearly $1 million from a private security firm.

There are five categories of uncovered-bug-to-reward ratio in the Apple Bug Bounty Program:

CategoryReward
Vulnerabilities in secure boot firmware componentsUp to $200,000
Vulnerabilities that allow extraction of confidential material from Secure EnclaveUp to $100,000
Executions of arbitrary or malicious code with kernel privilegesUp to $50,000
Access to iCloud account data on Apple serversUp to $50,000
Access from a sandboxed process to user data outside the sandboxUp to $25,000

The Apple bug bounty program will be launched in September, and at first, participation would be on an invitation-only basis, and the program will be open only to researchers who have previously disclosed tangible vulnerabilities to Apple. New researchers won't be turned away, however, as long as they make and provide useful security disclosures. Apple plans to expand the program slowly, in order to avoid an influx of reports that could overshadow important security discoveries should the program be opened to all and sundry at launch.

For researches to be able to claim the prize for a disclosure, they will have to follow the usual procedure; provide a proof-of-concept based on the latest software in question (which is iOS in this case) and the latest hardware compatible with the software. The exact amount won would be determined by some security factors like clarity of report, risk to users of the software, and others. The final decision will be taken by Apple. The tech giant also plans to encourage winners of its bug bounty to decorate their rewards to charity; if a winner decides to do so and his/her chosen charity institution is approved, Apple will double the reward that person gets and it would all be donated to charity.


It has been announced, and there is no going back. Apple Bug Bounty Program is here, and is launching in September. iOS developers can now dust their hacking tools and get to work, because the competition's gonna be stiff from now on.

Saturday

Facebook plans to add MSQRD Selfie Filters functionality in News Feed

If you are familiar with the MSQRD video filter app for smartphones, then what I'm about to say won't be too strange to you. If you aren't, let me tell you a bit about the MSQRD app.

MSQRD, whose actual nae is Masquerade but was styled to that probably due to its scary nature, is a filter app for selfies and videos, which allows (or allowed) users to add filters and lenses to selfies and videos they took. The app was still in its start-up stages when it was acquired by Facebook for about $117 Million in March.

Until recently, nothing was heard of the app, and none of its features were seen integrated into Facebook platforms. Now, Facebook is testing a new feature that puts a camera at the top of News Feed and allows Facebook users to add filters to their selfies. The feature is similar to the selfie filter in Snapchat, and from reports of testers, the feature will have to be enabled by tapping on the camera button, after which it will be enabled automatically each time the Facebook app is started.


Though the feature is available for the Facebook app for iOS and Android, it is currently open for testing by iOS users in Brazil and users of both platforms in Canada only. The feature offers filters and face-altering lenses that can be applied as overlay on top of pictures and selfies, just like that in Snapchat. Users in Brazil and Canada already have the ability to apply Olympics-themed filters to their pictures and post them directly to their Facebook profiles.

When the feature rolls out officially, it would only be available for the Facebook application for Android and iOS, though, and is likely not to be accessible on the web-based platform.

Wednesday

Google adds support for Rio 2016 Olympic Games with Google Search, Youtube & Google Maps

The 2016 Olympic Games scheduled to hold in Rio De Janeiro, Brazil is fast approaching. The Games will start officially on August 5, and for those who would be unable to journey to Brazil to witness the event live, Google has come to the rescue. The consumer-friendly tech giant is introducing new features across all of its internet platforms to make it easier for sports lovers to keep up with all the action at the Rio 2016 Olympics. And for those in major countries in Africa, you can check out some brain teasing Quiz that can even help you shop in the spirit of the game.


Starting with Google Search, when you search for the word "Olympics" or any similar variation of it, either in the web-based search engine or in your iOS/Android Google App, an in-depth search result that allows you to get information about the happenings in the Olympics will be shown at the top of the Search Page or the Google App, and this info can even be sorted into categories of country, sport type, event and specific athlete competing in the event.


Furthermore, the web-based Search results will let you view TV schedules for events and results of past events in more than 60 countries. And in the Google App for iOS and Android devices, you will be able to sign up for push alerts for situations when an event has been completed or a medal has been won.


Also in Search Trends, a variation of Google Search that showcases only the latest and trending events and happenings all over the world, this year's Olympics will be getting a special seat. Google will be showing unique Olympics-based Search Trends results and insights combined with data visualizations, to make sure you understand exactly what's going on Rio even without you being there.

Moving on to Youtube, the company's second most successful online product, 15 of the video portal's top video creators will be specially sponsored to the Olympics Games in Rio to give Youtubers a taste of what it would be like to be physically present there. Youtube will offer live streaming of the Games on mobile from these top video content creators, and highlights of the event will be shown from official broadcasters in more than 60 countries of the world.

Finally, some features of Google Maps like Street View will be beefed up to allow users to explore Rio and all venues in the city where Olympic events would be taking place.

OF COURSE, all these can't compare to being present live at the event, but will serve to bring the happenings of the events closer to us than ever, through technology.

The Rio 2016 Olympics Games is starting officially on August 5, so stay tuned here, because we will be bringing all the tech-related happenings in Rio to you, live in 3D ;) .