Monday

Create and Publish Blog Posts directly from Microsoft Office Word

Microsoft Office Word is not just an application you use for typing documents such as memos, letters, letter heads, legal copies, or reference documents, you can also use this Application to create and publish your Blog posts, and you may even find using it more interested, few reason may be because you are bored using your Dashboard,  you aren't used to creating your blog posts from the  Dashboard or you are a "Ms Office Word Typist freak"  who wants to blog without leaving the Microsoft Office Word Application that you are very much used to.

Blog with  Microsoft Office Word

 We would be using the Microsoft Office Word 2007 version as reference for doing this, it seems to be the most popular around. You must have an internet connection to use it since you would be Signing in  and uploading photos via the application. Here's how you should blog with it.
  1. Open your Microsoft Office Word 2007
  2. Click the Menu Icon >> New >> double Click New Blog Post 
  3. A Pop up will show telling you to Register a Blog Account, you can choose to Register Later if you want to start blogging immediately, if you choose Register Now,  the blog Registration Wizard will open, all you have to do is Choose your Blog Provider from this List: Blogger, WordPress, TypePad and so on.
  4. After choosing your Provider, Sign In with your Login Details,
  5. Next is choosing to Upload photos to your blog post, if you don't want to upload photos to the blog post, you can simply skip the steps below by clicking "None- Don't Upload Pictures" then click OK to Sign in so you can start creating and publishing your posts.
    NOTE: Please take note of the Notification Message that pops out telling you

    When Word sends information to the Blog Service Provider, it may be possible for other people to see that information. This information includes your username and password.

    I haven't heard of bloggers' Account hacked or Hijacked simply because he/she was blogging from MS Office Word application but if you are not okay with this, simply click NO, still, this shouldn't discourage you from going on blogging with the Application.

    How To Upload Pictures Along with Your Posts On Ms Office Word
    As mentioned in Step 5, you can Upload photos to your posts, after giving your Login details, the picture option will come next, Click My Own Server.


    After you select My own server, type the URLs for uploading and for displaying images.
    • In the Upload URL box, type the address that you use to upload pictures to your picture provider's server. This can be an FTP or HTTP address (i.e web address like Google Images), depending on the server configuration. Using your browser Copy and Paste it in the Upload URL.
    • In the Source URL box, type the HTTP address that is used to display the pictures. The blog post will use this address as part of the IMG tag in the HTML of the blog post files.
    As soon as these URLs are correct the photo will be uploaded Successfully along with your blog post.


    Thursday

    Airtel Bundle Tweak Updated For April - Get Free Airtel Data Bundle Now

    Airtel Nigeria is at it again, two months ago I posted tweak which would fetch us  a bundle data of 25MB for free, I'm not sure that tweak lasted up to 48 hours, now I don't understand if it's some kind of secret promo for their users or something, just this morning, a generous friend of mine called me asking if I have this Tweak, I said No, so he shared it with me, I tested it and it worked immediately.


    So i decided sharing the tweak with you,
    Simply Dial  * 141 * 13 * 1 #

    You instantly get 10 MB worth of Data bundle to browse with for 7 days, Free!.
    Redialing it for a data bundle Top Up doesn't work if you are thinking of doing that. And it works just once on every Airtel SIM.
    It's Still a good one since tweaks are pretty hard to get nowadays right?

    Don't forget to Share this with friends that need it too if you found it helpful. Use our Share buttons below this post.  Enjoy!!

    Wednesday

    Reset/ Format/ Resurrect Your Nokia with Hard Reset, No Internet or External Devices Needed

    Sometimes our Nokia fones, especially Symbian, can start becoming too slow than it supposed to, it cannot run properly as expected, these problems may be due to Internal Memory or/and MicroSD Card, which i will explain at the end of this post.

    Months back, I had this cool application called Flip font which some of us, Symbian users know well about. Then, I had very little knowledge handling it so when I toyed around with some folders, using X-plore while I had this Flip font stored in my phone's internal memory, the C: drive got corrupted and my phone Crashed,  it went off and couldn't boot On again. I use a method called Hard Reset, though there are two ways you can Reset your mobile.

    • Soft Reset: clears pending errors and bring your mobile to its initial state by restoring factory settings. To do this, the shortcut is: *#7380# 

    • Hard Reset: you can use this if soft reset proves not working, and the errors still remain in the phone,  doing a hard reset takes 2 ways, just enter the code: *#7370# and press Yes to confirm.
    Or you can press a combination of buttons (this is the last option to take in cases where the phone refuses to Boot),also known as RE-flashing or the "3-Finger Salute" and it works most various Symbian phones.


    NOTE:  Ensure you back up your files into your Memory card since doing this would format/delete all data in your C: Drive (Phone's Memory)
     
    Working on Nokia E51,  E63, Nokia E5, N95, N81, N73, E65, E51, E55 (Symbian V3 and V5 phones)
    Remove and REinsert the battery.
    Hold the following buttons *, 3 (number button) and Talk/Green key.
    Now press the Power button on the phone, do not release those buttons until you see the Nokia boot up screen. once you feel the phone power up you can let go off the power button while still holding all three button.
    working on Nokia 5800XM
    Use the following buttons to do a hard reset on Nokia 5800XM, press and Hold GREEN/ RED/ CAMERA keys all at once, then Press power button. this will only work on 5800's that have firmware version 20... and up. )

    Summary

    The good thing about this that it turns restores your phone back to factory Setting, making it seem like it's New, but the ugly  part is that you will loose your Files, if not all.

    What you Should know about what can make you Reset your Phone?

    Internal Memory

    When the phone's ROM (Read Only  memory) get almost full, there are no more spaces to store caches from your browsers, apps, receive Messages/files and so on,  it would definitely alter the speed at which it operates.
    * Make your external memory (Micro SD) your primary Storage since it has more space for saving data
    * Ensure you don't install malicious applications inside your phone's primary memory, it would easily harm the phone's system.
    Keep the internal memory strictly for data which can only be pre-installed in the internal memory by Default, such as caches, firmwares, cookies etc.

    Micro SD Card Memory

    * Same matters of slow operating system will arise when your memory card gets full, in this case, deleting some files might be the solution.
    * Do not always go for Micro SD Cards (MMC) with very high capacity, if your Manufacturer recommends a 3 Gigabyte Memory card for the phone, then use it that way, ignoring such recommendations to go for more might later end up crashing the phone.


    Friday

    Restore Lost Files in Avast Antivirus Security Software

          If you have Avast, one of the worlds most popular Anti-virus Software running on your computer system, then you certainly must have come across a critical issue whereby this software starts to frequently detect viruses in your Files, and automatically moves them to the Antivirus Chest. The bad news about this is whether these files truly contains viruses or not, this software doesn't wanna know anymore. Making one feel frustrated.

         I had been through an exact situation using the new Avast version 7, i am not sure of why it happened, maybe it's because I updated the Virus Definitions or something, but I tell you, I felt quite bad, because I was loosing files that were relevant to me, I was confused at first, yet the fact remained that except I perform some operations in the Avast Security Software, there's was no way I was going to get these Files back.
    Now, if you find yourself in the same situation like me, you should do what I did to get them Restored back to my PC.

    Here's What I did:
    • Launch the Avast Security Software, you can also find it by Clicking your Windows Start button >> All Programs, you'll see a list of all Programs installed on your PC, take a closer look at the list, you'll find it. The software opens displaying Summary with Updates...
    •  Click MAINTENANCE
    • Right underneath it, you find Virus Chest, click it


    Here you'll find a list of all the files you lost that the Avast software had moved to Chest, simply select the file, right-click your mouse, you see an Option telling you to Restore it back to your System, click it, then your lost file(s) will be successfully recovered back to where it was before.


      Easy ways To ByPass Problems Signing Up On Yahoo!

      As most of us know, Yahoo! comes with great site features like Mails, Messengers, Jobs, Horoscopes, Movies, omg!, Flickr, and so on, and you are not fully authorised to participate in  these Services without owning an Account with them.
      In most cases, I have experienced people having difficulties Signing Up on Yahoo!. They would normally try at least 3 to 5 times before their Registration becomes Successful, perhaps you have experienced such too.
      Well, the truth is that I had helped people Sign up for a Yahoo! Account at one trial and it was successful, you too can do it.
      Assuming you are using a PC, to do this, you surely have to bear some measures in mind, or else you'll find yourself trying to Register again and again,  even though you are providing them with the right Details they need.


      Ways to Easily Bypass problems when Signing Up for a Yahoo Mail or ID are: 
      • Allow the Registration Page to load completely: I wouldn't recommend you sign up for a Yahoo account if you have a poor connection because this might affect the content of the page, hence alter your registration progress.
      • Ensure the time on your Device is Correct: Ever seen a Question popped out a Yahoo registration asking you;"Are you from the future?", this question comes up from the side of the box where you give them your Birthday details and it is a good example of what would stuck up your registration if the time on your Device is wrong. Be certain your time on your device or computer system is correct to avoid such.
      • Use Simple E-mail addresses/IDs with Strong Passwords: Your e-mail address must not include any space between the characters, any part of the name you are using to sign up for the new account, and should be kept simple for your use and the length the password should be nothing less than 8 characters, try to use signs or numbers in the passwords, you must keep it personal and be able to easily remember the password any time.
      • In case you forget your ID or password... : You will always see this on while Signing up for a new Yahoo account, make sure the details you give in Alternate Email(optional), Secret Question 1 and Secret Question 2 and genuine and can always be provided by you in case you forget your ID and password. This will make signing up and retrieving of your account faster for you.
      • Ensure your brower's Images are On: since Yahoo Registration displays Security Captcha, make sure the image view is turned, specifically if you are trying to sign up using your Mobile. This will avoid them telling you had typed the wrong codes in the image.

      With these few tips, I believe you find Registration on Yahoo much easier. Like I had mentioned earlier in this Post, Signing Up on Yahoo at one trial is very possible.

      Wednesday

      How to Type On PC without Keyboard

               A Computer system without a keyboard, as many people think, is as useless as a cooker with no gas, seeing a computer system with no keyboard gives an instant feeling that you cannot do anything with it.
      About a week ago from the day I created this blog post, I was with my colleagues in a cafe, one of them got stranded because I had removed the keyboard from the system he was going to use and plugged into another PC for something else.
         Looking  at this situation, it's hopeless, he can't do anything, but, after a few searches, I rendered a tremedy to find this good feature which people may not know exist on their computers, so if  for some reason you don't have an available keyboard to use, following this easy Steps with the screenshot below will give you hints on how you should go on typing on a Computer, even at the absence of a keyboard:


      1. Go to your Windows Start button
      2. Click on All Programs
      3.  You will see a list of all Programs in your Computer, right on above, you will find Accessibility, now  click it.
      4. Next, you see the last list from which you find the On Screen Keyboard, click it. 
       The On-Screen keyboard Opens for you to use

      Extra Tip: Perhaps a key is faulty or missing on your keyboard, you may find and type it using this virtual keyboard too.

      Hope you find this little tip helpful, you can share it with friends using our Share buttons below.


      Thursday

      5 Great Ways to Begin Your Next Blog Post

      Before I set my fingers on keyboard to type this, I thought of the Title, "5 Great ways To Begin Your Next Blog Post". Next, I opened a new tab and typed a few Keywords into Google's Search Engine, "Ways to Begin a Blog post", though the keywords I typed on the Search engine and the Title of this Post seems so similar, most results on the first page consisted on how you can  
      >>Go to To your Dashboard,
      >>Click new Post to begin a new blog post and all that... , but hey, this is not what I'm discussing here, rather we will be moving to something very much more important than that.

      Let's face the fact, if not uncountable, there are Zillions of blogs published everyday, yet only about 21% of these blogs world wide really know how to start a post in a such a great way that would be appealing to readers, hence make them read more and come back for more.

      You can go ahead, take few seconds and read this post again from the beginning, did you notice what I did? How I got you to read past the first paragraph, even the second, well, that's what I'm talking about in this post.
      Just as they say, "First impressions matters most in Life",  the quality you give to the first paragraph you make on a new post is important, it will determine whether your readers should go on reading it to the very end.

      It doesn't matter what niche you are blogging about, after reading this, you'll be able to literally ''Copy & Paste'' the techniques to your own posts, and hopefully gain better results,
      below are 5 Great Ways to Begin Your Next Blog Post.... Or Adjust the Older ones.
        
      • Ask a Question
      Asking questions is one of the easiest, surest and captivating way of beginning your posts, you can check out or recall other blogs you have visited, they use this technique and you enjoyed reading from them because it worked.
      Using this method is not just a simple way of getting started but also a way of attracting your readers to read more.
      A good example of this method of starting a new post is this Question:

      “Do you ever wonder if the positioning of the elements on your website are really making any sense?”


      • Start with a Quote

      Yes, I know starting with a quote feels like you are some public speaker, preacher, motivator, or some high school student given an essay to write. Quotes in your posts can go further than you actually think. It is a great way of opening a new post, and of course, there should be quotes for a reason, that reason is what your readers would like to know about, thereby keep them reading that post to where you put a full stop.
      You can take a look at this 

      "Our business in life is not to get ahead of others, but to get ahead of ourselves"


      •  Go against The Rule
      Ever seen a write up beginning with strong sentences disagreeing with what every other person believes? It brings a kind of little shock or big surprise as you read the line right? Now, applying this technique also give your readers some sort of curiosity, making them doubt and ask themselves questions which will only be answered if they continue reading the post.

      for example : "Blogging about how to make Online cash is the best niche that yields the most pay from blog sites, I say NO, it's not true".

      •   Go On and Tell a Story
      Everybody loves stories, I do, and bet you also do, the method of opening a new post with a short interesting story really goes a long way keeping your readers involved, especially if it's Real.
      You can tell them how you went to a nearby super market, then to the electronics-section where you bought a gadget which is precisely the topic of the post you are discussing with them.
      I have used this technique to begin my posts several times and it worked for me.

      "It was about 6:35am in the morning, when I woke up from sleep, I took my phone, I had no expectations of seeing something that would be so amazing as I browsed Facebook Mobile, as usual, I saw much Notifications"

      •   Be Short and Direct 
      Again, take a snappy look at the way I opened this post down to this very point I'm rounding it up, there's no big deal about it, rather it's just one of the ways from those I had mentioned in the list above. The one thing you have to do is keep it short, simple, and neat. Drop something you want your readers to get out of the article, then, they will be interested in knowing how they can get it.An example is just like the title of this same post,

      "5 Great Ways to Begin Your Next Blog Post"

      Hope you pick one or more out of these tips and apply them. Your readers are expecting better posts from you.   Happy Blogging!

      Saturday

      EdiTweaks Wins A Free Custom Domain via OgbongeBlog.com

                  It was about 6:35am in the morning, when I woke up from sleep, I took my  phone, I had no expectations of seeing something that would be so amazing as I browsed Facebook  Mobile, as usual, I saw much Notifications, I normally would go for the ones that mattered most, like notifications telling me somebody posted on Bloggers Lab, a Facebook Group I personally joined late November, 2011.
               This time it was one of the "PROs" that posted, so I had to check it out, only to discover that ''He'' was asking for the owner of editweaks.blogspot.com, the blog you are reading this from now. A few others had commented on the post, he said he liked the look of the website and would give the owner a Custom Domain for Free, what do you expect? I had to quickly claim it.
      After a couple of processes, he helped me get the custom domain running in no time, so here are we, from editweaks.blogspot.com to www.editweaks.com.

           Now you must be wondering what is this generous pro website? Well, he is Ogbongeblog.com
      The young man behind this great website is Jide Ogunsanya, he is the Founder and CEO of Ogbongeblog.com and OgbongeSMS.com , he had been in the game for quite a very long time and has been a very Successful Personality in the blogoshere of and around my country. He works with top telecommuncations, along side other Nigerian Internet professionals and business experts. His blogsite, ogbongeblog.com is where he shares his personal interests which goes far and wide to different people around the world.
      Ogbongeblog shares stuffs on
      • Internet Marketing
      • Web/Blog Development including ADSENSE INTEGRATION
      • SEO Optimization (Making your site/blog rank well in Google and other search engines)
      • Link Submissions
      • Social Media Integration/Marketing (Facebook, Twitter)
      • Graphic Design
      • Blogger Blog restructuring (custom domain name, split headers/footers and more hacks...) 
      • Tech Consulting
      • Seminar training.....to mention but few, including Freebies Fans like me that Won this Custom domain from Him.
      You can give that site a try, you sure would get something good from it, something which may be even bigger than what I got.

        Dear readers, you can join, It's Official, EdiTweaks.com is saying a very Big Thank You to Ogbongeblog.com for helping him move to the next Level.


      Wednesday

      How to Take ScreenShots using Opera Mini

      First of all, I would like to refer you to this Post which tells us how we can take Screenshots of anything displaying on our phone's, it's very much easier and flexible but it's only for Symbian phones, but this post will tell us how to use the World's number One Mobile browser, Opera Mini to take Screenshots of webpages as we browse with it.
      It will be beneficial especially to those using s40 or other phones different from Symbian, though the Opera works on both s40 and s60 phones, a very large advantage of s60 over s40 phones right?.
      And... Yes, there are many Operas that can take screenshots, this one seems to be the easiest to use, I'm talking about Opera mini Mod 4.21 beta9HandlerUI by the same great modder called Sir Handler.

      Description
      * This Opera Mini app is in J2ME platform (.jar file format)
      * It has been Modded incase you have an FBTweak to make it browse for for free
      * Screenshotter embedded, which is the main reason of writing this post.
      * File size - 420kB. Don't worry so much about the size, it runs perfectly well on s40v3 phones and Upwards.


      How To Take ScreenShots Using This Opera
      First,
      After downloading and Installing, Launch the Opera, follow the steps below if you wanna take a Screenshot of a particular page while you are browsingit.
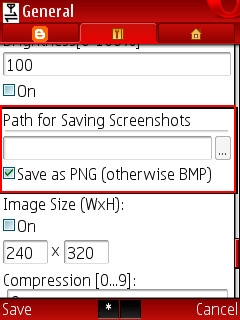
      First, we are gonna choose a path where all our Screenshots will be stored, you can choose to store them in your Gallery or MMC.
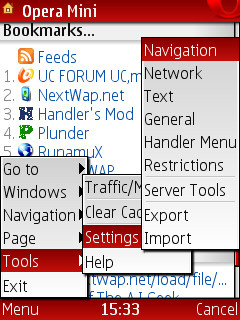
      1.  Go to Menu >> Tools >> Settings >> General
      2.  Scroll Down to where you find "Path for Saving Screenshots"
      3. (a.) Edit the Box and type  E://   as your Saving destination if your're going to be saving all screenshots in to the Root Folder of your MMC (memory card)
        (b.) Or you may Edit the box and type C://data/Images if you want it stored right in the images folder of your phone's Gallery, but if you don't understand this, you can simply open and choose the path by clicking the box next to the one you can type in.
      4. Save the Setting.
      5. Again, go to Menu >> Tools >> Settings >> Navigation
      6. Scroll down a bit, you'll find "Shortcuts", Click on Edit, you'll see a Numbered List of Shortcuts 
      7. Scroll down to Number '44', where we have Screenshot/Empty 
      8. Now, click it, an Action will pop-up, Press the desired buttons (screenshotter Keys) which will be taking snapshots for you while browse,it should be a maximum of 2 buttons.
      9. Save and we are done
      Here's a Screenshot of this site's mobile page view which I took using the opera


      I actually chose to use the ( * ) button for taking my screenshots in my Nokia 3110c, an s40v3 phone, so you can take that button as a reference when choosing your own screenshotter key.
      Remember if you found it helpful, perhaps, someone out there could be needing it too, use the SHARE buttons below, and as I would always say, it takes nothing less than 5 seconds to share.

      Tuesday

      How To Take Screenshots with Symbian OS (s60 )

      Ever wondered How people get Screenshots of different scenes on their Phones? Especially internet tutors. They show you images like Menu, Wallpapers, or any other path from their phone's display system, just exactly the way it appears on your phone, well, here's the Tip, they use an Application called Screenshot.

      This App takes Screenshots of anything currently displaying on your mobile phone. It's so flexible that with it, you can take a screenshot of another App running on your phone and it's only for most Symbian OS (s60) mobile phones.

      Here are some screenshots I got using the Screenshot app:


      Screenshot for Symbian OS (S60 3rd Edition) version 3.01
      Supported devices: Nokia 3250, N71, N73, N75, N76, N80, N81, N82, N91, N92, N93, N95, E50, E51, E60, E61, E61i, E62, E65, E70, E90

      Screenshot for Symbian OS (S60 3rd Edition) version 3.03 - UNSIGNED
      Supported devices: Nokia 3250, N71, N73, N75, N76, N80, N81, N82, N91, N92, N93, N95, E50, E51, E60, E61, E61i, E62, E63, E65, E70, E90.
      Screenshot for Symbian OS (S60 1st/2nd Edition) version 2.50
      Supported devices: Nokia 3230, 3600, 3620, 3650, 3660, 6260, 6600, 6630, 6670, 6680, 6681, 6682, 7610, 7650, N70, N72, N90, N-Gage, N-Gage QD.

      If the none of the ones we have above doesn't work for you, then you can get this one from SourceForge.net . It works on almost any symbian OS with a File size of about 240kB.